Sunday, April 30, 2006

Symborski Transmission Shifter Base Kit


These are ready to go in when I can find some time off work to get on with my life. It's been hell the pass two weeks with up to 15-16 work hours per day. The Symborski transmission shifter base bushes are made from aluminium and will help to eliminate the sloppy movement of the shifter base plate resulting in much more defined shift pattern. The stock rubber bushes are designed with NVH elimination as the primary focus and little else. According to Jack they're lighter than the stock rubber bushes too believe it or not.

My friggin titanium fasteners took more than 4 weeks to arrive. Also, notice that the bolts are natural colour while the washers are anodized blue. Everything was supposed to be blue. Miscomunication from my part due to work stress. Aarrrrgh!. Nevermind. Once everything is installed you won't be able to see s**t. The clear coloured titanium bolt with blue anodized washer also turns out looking pretty cool imho. Full installation report to follow. Oh.. these fasteners cost nearly double the cost of the Symborski transmission shifter base bushes. The kit (without the Ti fasteners is RM120) if you're interested. E-mail me.

It's a Blue World! Cusco "Pillowball" Suspension Top Mounts

If you're using uprated shocks and want more improvement in steering and suspension feel and damping, the next step to go would be to replace the stock rubber mounts on top of your front and rear shocks with spherical bearinged versions. The spherical bearing eliminates unwanted rubber flex which can hinder the shocks damping. The 101 in Suspension Theory states that the shock absorber should be the only component doing the damping. This is however not the case for road cars. Rubber bushes reduce NVH and maximum ride comfort but they also flex and introduce unwarranted uncontrollable damping movement of their own. The Japs like to call spherical bearings "pillowball mounts" hence the term.

I emailed DMS on which was the most suitable top mount for my 50mm shock and was surprised to hear Cusco. In fact Cusco even used to oem for DMS Japan. Since then DMS has manufactured their own specific and improved version of the top mount but last I heard these are only available for the newer Evos and Imprezas. Picture below of the new DMS Top Mount. Picture below of the new DMS top mount for Evo7-9

Anyway, back to my Cuscos. I decided to replace both my front and rear top mounts at one go. Also had to order the DMS fitting kit (top nut and metal adapter) to enable to Cusco to clear the larger diameter DMS 50mm shaft. Price per mount is about RM750 so to replace both the front and rear sets would set you back RM1.5K. For those on a budget I would recommend only replacing the fronts as these are designed to allow you to adjust the camber easily. The rears are fixed. Picture below of the front Cusco pillowball mount (Part Number 508 410A). The nut with the shorter shaft (left most) is the DMS fitting kit.

Picture below showing the bottom of the mount. The camber is adjusted via the bottom sliding steel black plate and pillow ball section. The top blue anodized plate is made from 60mm thick 2017S heat treated aluminium alloy.

Both top and bottom plates are held together via 4 M6 X 20mm bolts which Cusco supplied the el cheapo mild steel variety. Arrgh! Needless to say I dutifully replaced these with stainless steel versions.

The Cusco rear mounts are available in 3 types to incorporate different spring diameters used by different shocks. The rear mounts are availble to suit 60mm, 65mm and 70mm coil spring diameters. Yes, these can also be used for conventional non-coilover shocks. If in doubt check with your shock manufacturer. Picture below of rear mount, part number 508 421S for 70mm spring which was advised by DMS to be used for my shock. The part number for 60mm spring is 508 421 A60 and 65mm spring is 508 421 A65.

Installation took the most of the day and the shocks would have to be removed from the car. Closeup picture below of the Cusco top mount installed on my DMS 50mm front shock.

Closeup picture below of rear shock/damper with Cusco top mount.

Rear shocks ready to be installed back on the SP.

So how does the car perform with these mounts installed? One word.. "Excellent"!. Steering feel is much improve and so is the suspension damping. For those using rubber top mounts you can literally feel the mounts flexing under hard cornering load and this is totally eliminated with the Cuscos installed. The cons? Well if you want first class NVH then the Cusco mounts are not for you. You can really feel the road! Also, until the spherical bearing is fully broken in, you will get an alarming clunk from your springs when turning on an uneven surface. Takes a couple weeks to clear up but then honestly I couldn't be bothered. The SP's loud as it is already. Also the flex on the rubber bushes helps to reduce the load to your chasis suspension turrets. Going to stiffer mounts simply means all this load is now acting on your chassis shock mount turrets. Inspect them regularly for signs of fatigue or crack at the seams.

Friday, April 28, 2006

Header Design, Fabrication and Terminology 101

Casey Heerman, Assistant Technical Director of Burns Stainless LLC (a popular American Exhaust Design Consultant and Parts Supplier) recently posted this article in the K20A.org forum. Excellent read..

Header Material- headers can be made from a variety of different materials. 304 ss 321 ss Mild Steel Titanium and Inconel 625

304 SS - Is your run of the mill material and will work for most NA applications the most common thickness is .065 wall or 16g, to save some weight you can go to 18g .049 or even 20g .035 for the experienced fabricator

321 ss - Is found on most turbocharged applications in a 16g .065 wall thickness. The use of 321 is advantageous as it will maintain it's strength properties at elevated temperatures. 321 is also good for use in 20g .035 Na headers where better strength properties are desirable.

Mild Steel - Is your standard run of the mill tubing very easy to fabricate with, and very inexpensive. It does rust and it will eventually decay into nothing as far as I'm aware from a headercentric stand point it offer no favorable properties over mild steel, except for the slightly lower coefficient of thermal expansion

Inconel 625 - IS the most wonderful material to use in a header but heck we don't all make what bill gates does. 625 has excellent strength properties, fatigue resistance, it doesn’t grow as much as stainless and it insulated better then stainless. It is essentially a Super stainless alloy. It's very expensive and can be used in wall thicknesses of .028 22g to fabricate NA headers, which can provide a great weight savings.

Titanium - I have heard mixed opinions on the use of Ti for header construction, some say it wont last some say it will regardless it's extremely hard to bend and even harder to find in the sizes needed so we won't delve into this too much. However if used it can offer a wonderful weight savings.

Head Flange - This is the base of the header normally offered in two different materials 304SS and Mild Steel. Both materials have good properties, the mild steel being quite a bit better for the beginner builder as it does not warp near as much when you weld it. When using a 304 SS flange it is going to warp quite a bit, it will require surfacing, a 20" face grinder is great for this. Flanges should be the same shape as the exhaust port and a certain amount larger to allow for the tubing to be fit to the port a rule of thumb is large enough to fit .065 tubes.

Primary tubes - These XX number of tubes will channel exhaust gas to the merge Collector. They should have both a length and a size measurement along with notation of steps.

Example: Primaries: 28" X 1.75 Od : This would indicate a primary length of 28" OAL starting at the face of the cylinder head and ending at the very end of the tube.

The primary tubes length and size is very important, for different length and sizes you can actually change the power curve pretty significantly if you have an engine that responds well to exhaust changes.

On a Tri-Y or 4-2-1 header they still have primary tubes, the primaries on a tri-y start at the face of the head and end at the end of the tube that enters the first set of collectors. Immediately after the primary tubes end the secondary tubes begin.

Secondary Tubes - These start Immediately after the primary tubes end, they Include a portion of the collector. This is another area of adjustability that can offer good header tuning. When the header is constructed properly you will be able to see a change in the engine by adjusting the size and length of the secondary's.

Merge Collectors - Merge Collectors are MOST COMMONLY REFFERED TO BE THERE INLET SIZE. The inlet size is the Od size of the tube that the collector must slip over. a 3" Collector to me means 3" primary tubes.

Parts of the collector
Inlet - As stated above, in our world this will 99% of the time be a slip fit. If your going to call the collector refer to it by this size

Collector Choke (minor diameter) - This is the size the can make or break a good header This doesn’t need to be 3" unless you have something super weird going on with your engine. I have not design a Honda header yet that even needs close to a 3" Collector choke. I’m not saying it wont or cant happen, I’m just very skeptical of it

Final Outlet - The final outlet can be configured a variety of ways. Most common for road going cars that need mufflers is a transition from the choke to the correct tailpipe size and a ring (ring is a straight section of tubing where you can slip fit weld a flange V-band etc.) . Another configuration that we often use and popularized if not Pioneered is the megaphone with reverse cone we have used this in many applications with great success and use it as often as possible. When using a large diameter final outlet like a 3" on a K series engine, if bogging is epxerienced at low rpm you need to consider retuning the engine, this not a fault of header, large exhaust or open exhaust

Header Configurations
4-1: a 4-1 Header is typically going to operate in a farily narrow rpm band of say 4000 RPM, people that ask a 4:1 to do more then this are asking way too much of the header. However the rpm range can be lengthened by the implemetion of a megaphone and reverse cone and will work well when sized correctly

4-2-1 or Tri-Y: A Tri-Y will typically operate in a very broad rPm range. When designed correctly they will dramatically increase the mid range without loss of peak HP

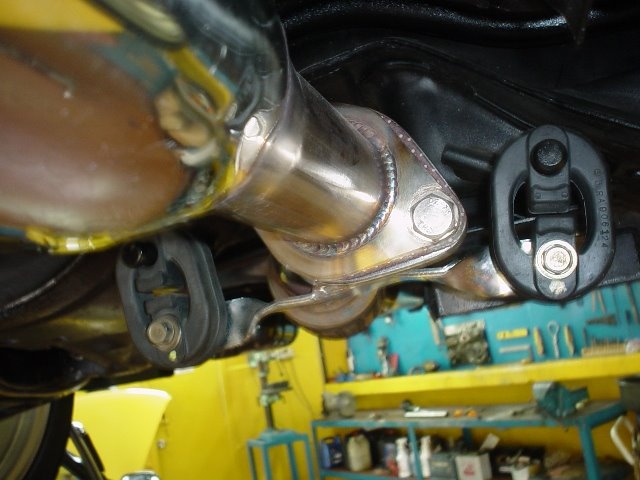
And here's a recent example of the excellent work done by Burns Stainless. Exhaust shown is a 4-1-2 long primary design for a K24 road race engine. Material used to fabricate the header is 321 stainless. One day I will have such an exhaust on the SP. Price of header? Don't ask..

Sunday, April 23, 2006

Daily Driver

It's time to get a daily beater as I'm getting old and want a comfy conventional car that I can cruise around. Slowly... The SP just hates going slow and pottling around in traffic is a pain due to the on-off effect of the lightweight flywheel and big cams. It's like trying to take your pet Lion for a walk in the park if you get the drift. Want a 4 door banger that handles reasonably well and doesn't look like it just came from a senior folk's home. Budget's 100K max as spending more means I won't have enough moolah to continue the development of the SP. Currently in my top 2 list are the Nissan Sentra 1.6 Manual (Hoorah!) and the Suzuki Swift. Suggestions, comments and opinions? Wifey's dead against me getting another Proton. Don't suggest the Chevie Optra as wifey already has one and also not the Vios as I talked her out of buying it to get the Optra instead. And no offence to Honda City owners but that car reminds me of something from the frog family possibly a tadpole..

Friday, April 14, 2006

Catpain


Picture above is what one of my local friendly stray cats did to my car cover. Because of the cat problem I've been having for the last couple years I've had to change car covers every 6 months or so. And because of the cat, the SP now has 2 car covers and lotsa rags on the bonnet to protect it. Not that I'm being paranoid but imagine what would happen if kitty dearest exercises it's claw sharpening on the carbon bonnet! This latest incident even holed the additional car cover below. Luckily the bonnet was unmarked. On top of this the cats like to fertilize the garden and backyard with their faeces and my poor parents and me have had to wash the compound and backyard nearly every other week.

I've tried everything from putting additional fencing (but these buggers climb better than Spiderman) to washing the compound with vinegar. (only worked for bout 2 weeks before our excellent rains washed off everything) to chasing them and spraying them with water but they keep coming back. This latest incident is fast approaching the last straw as far as I'm concerned. Apart from getting a shotgun and blowing these buggers to kitty heaven does someone have a better suggestion? Any volunteers to come catch the cats?

Monday, April 10, 2006

Evo Boot Bar

Since the Evo5, Mitsubishi has installed an additional bar in the boot in an effort to make the rear chassis stiffer. The bar installs via the 2 bolts holding the rear bumper support/reinforcement. Picture of said bar from a Mitsu Evo7 brochure.

While surfin the web and doing my research on car mods I came across several Jap Mirage and Lancer web sites highlighting this mod and what caught my eye was the fact that this means the same bar can also be fitted to the Wira, Putra and Satria. A couple emails to Ralliart and also a couple hundred bucks (about RM300) poorer the boot bar dutifully arrived at my door step. Weight of the bar is next to nothing as it is constructed fromp pressed aluminium plate. Installation was a no-brainer and DIY. All you need to do is to remove 2 bolts, place the bar over the bolt holes in the boot making sure the holes on the 2 corners of the bar are aligned with the bolt holes and re-fasten back the bolts. I also took the opportunity to replace the 2 bolts and washers with Ti items. Pictures below of bar installed on the SP.


The bar takes up very very minimal space in the boot so for those of you who like to use your boot as a mobile drawer or cabinet don't worry. The effect can be felt immediately with less squeaks emnating from the boot area especially when going over speed bumps that seem to be everywhere in our country.

Wednesday, April 05, 2006

TMM Archives - Carbon Radiator "Slam" Panel

A good way to prevent the airflow from spilling out of the gap between the radiator and the car's front subframe would be to fit a radiator slam panel. The slam panel blocks out the gap thus ensuring the airflow is only through the radiator improving cooling efficiency. Picture below of the radiator slam panel for the SP. Fits any Satria/Wira/Putra/GTI. If you're one of those that think raising the back of your bonnet with spacers looks cool then the slam panel will not clear the bonnet as my bro Senior found out much to his dismay. I choose not to cut a hole for the radiator although that can be done. Removing the radiator also removes a couple hundred grammes of useless weight.

Closeup of the bottom surface. Yes, it's 101% carbon. No CSM aka fibreglass.

Installed on the SP. Button head bolt on the slam panel is Titanium. The 4 bolts holding the top radiator brackets is PB 7075 aluminium.

Saturday, April 01, 2006

Ralliart Group N Exhaust Hangers

A good way to extend the life of your exhaust by preventing it from moving too much under hard acceleration and braking would be to upgrade the stock exhaust hangers. The stock exhaust hangers are really too soft and they get even worse over a period of time. Too much movement of the exhaust would just lead to more stress related failures.

I have decided to upgrade my stock muffler hangers to Ralliart Group N items. These are made from Hs90 grade rubber and really much much stiffer than the stock hangers. The Putra runs 7 of such hangers but unless you like a vibrator to go with your performance car it would do you well to upgrade only 2 to 4 of these hangers. Do bear in mind that these hangers are essentially for race/rally/competition use where NVH is not in the agenda. I would recommend the header flange to exhaust piping/catalytic converter hanger section and the rear section of the exhaust muffler. Saves your hard earned money too as each hanger costs more than RM50 so if you upgrade all 7 it's more than 350 moolahs. Picture below of the 2 available types of Ralliart exhaust hangers. The Putra only uses the oval shaped one on the left (Part Number RA906124K1). The other triangular shaped one is for the Mitsubishi Lancer Evolution 4 onwards(Part Number RA651790K1). However only 1 unit of RA651790K1 is used. The other 6 are still the oval shaped hangers.

Picture below of installed Ralliart exhaust hangers