Saturday, January 28, 2006

Aerocatch

During the development of my carbon bonnet I've been on the lookout for a decent bonnet pin to use. My carbon bonnet incorporates the same double latch mechanism as the stock steel bonnet but it's always advisable to use a bonnet bin especially if the car is thrashed occasionally. I actually bought the Sparco bonnet pin but the way it will stick out of the bonnet really doesn't thrill me plus they don't make one black anodized. Only in blue, red and silver.
Picture of conventional Sparco bonnet pins
It was then when my ever useful Racecar Engineering journal (first article on Aerocatch in December 2004 issue followed by recent article on bodywork fastener technology including Aerocatch in January 2006 issue)led me to a new state of the art bonnet pin called Aerocatch.

The Aerocatch was developed by UK Devon based Specialty Fasteners and Components (SFC) together with Exeter University and launched to the market in early 2005. SFC's brief called for a bonnet pin that was flush mounted for better aerodynamics and had a double locking action. The result is manufactured from high strength thermoplastic (injection moulded Grivory HT2V-5H 50% glass reinforced plastic giving a maximum working shear load of 3000N) that can be painted to your bonnet colour. Pressure releases a panel that then draws a sliding pin out of a hole in the end of your bonnet. The double locking action is achieved by first closing the panel and then by pressing on a protruding lever. There are 2 versions of the Aerocatch depending on your preference. The 120 Plush Flush incorporates a 2.5mm tall flange on the top surface of the bonnnet while the 125 Flush is flushed with the bonnet itself. Both models can be ordered with an additional key lock (at additional cost) giving you better security. More details in Aerocatch's web site

The Aerocatch has been proven in competition and won the 2005 BTCC used on the bonnet and boot of Matt Neal's Honda DC5 Integra Type R. With this in mind, myself, Senior, Jacko and David decided to approach SFC and order the Aerocatch. Rest of us ordered the standard 120 Plush Flush while paranoid Senior ordered his with the additional key lock. The bonnet pins dutifully arrived about 1 week later. Picture below of the package

Detailed locking and unlocking instructions behind

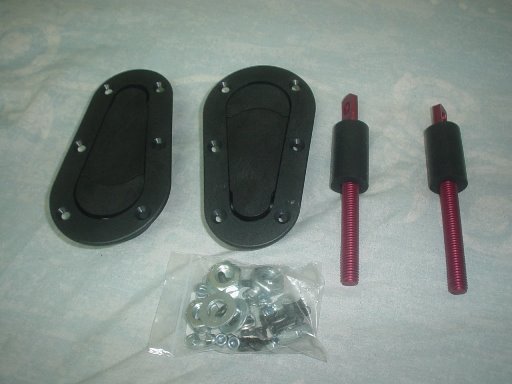
Components removed from package. Stud is available in any colour so long as it's red

With my bonnet not yet ready, my bro David decided to install the Aerocatch on his Wira 1.8. Installation is unfortunately a pain as a pretty large hole will need to be cut on the bonnet for the flange. The template for the hole is supplied together with the Aerocatch packaging. Picture below shows the bottom surface of the bonnet with the flange partially installed. The decision was made to separately purchase and use stainless steel bolts as I wasn't too thrilled with the supplied blackened mild steel screws. In addition the car's front metal beam where the Aerocatch pin is mounted has to be drilled for the studs and hammered a bit else the flange will not clear. Proton Wira/Satria/Putra/GTI's unfortunately have very little space under the bonnet where bonnet pins are mounted.

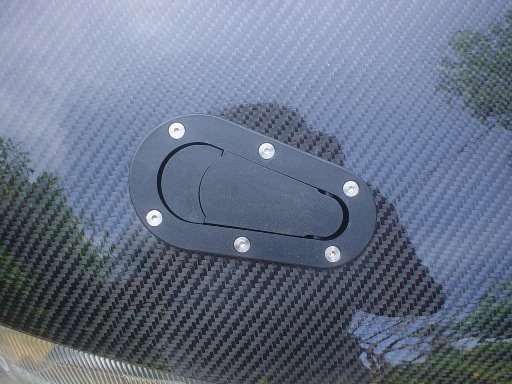
Picture below shows top surface of the bonnet with the Aerocatch secured after installation

Another picture with the bonnet closed and Aerocatch secured

Top Secret Japan has recently started to sell the Aerocatch but at a premium price (12,600 yen for the standard model not including shipping). More details on their website.
I'll follow up with more reports and pictures once I install my Aerocatch.

Monday, January 23, 2006

Chinese New Year Ang Pow

Here's a picture of my full carbon bonnet straight from the mould. The bonnet's been more than a year in making due to the high standards my bro and I have set for ourselves. Can't lose out to the likes of Varis, C-West or even ASM now can we? This will also hopefully prove that Malaysians can also produce carbon products of world class quality.

Will probably spend my CNY spare time finishing it. The sanding, finishing and clearcoating is going to be a real a pain. This is a full carbon bonnet and weights about 5+kg. There's no fibreglass (CSM) in it. Top bonnet skin is 4 layers of carbon cloth alone. Even the underframe is carbon. This will hopefully show that not all carbon bonnets are the same and that a bonnet which cost RM1K or less is not the same as those used in actual racecars. Most local produced bonnets are all CSM with one layer of carbon on top purely for aesthetic purpose and nothing much else.

Picture of the top layer and underframe before joining process

Closer side shot

Closer front shot. Weave quality is really straight eh? Surface quality is excellent IMHO.

Sneak shot of the underframe after joining.

Final arty picture of the bonnet basking in the soft morning sun

More pictures to follow once I complete the finishing process. Praying hard the fit is perfect else it'll be another consignment to the thrash bin. Stay tuned..

Friday, January 13, 2006

Senior's Carbon Bonnet

A fellow Bro of mine with the nick Senior (due to the seniority of his mods. I kid you not!) had lots of grief with his tall 4G63T EVO3 engine and had to resort to using unsightly thick fat spacers between the bonnet and it's hinge to clear the 4G63T's timing belt cover. I know lots of people out there think a raised bonnet looks trick but from an engineering standpoint it's pretty bad. I mean how many race cars out there do you see doing this? Increases drag and spoils the airflow. Senior tried the the el cheapo RM900 frp/cf bonnets with no full frame but even this didn't clear properly. Poor chap also couldn't fit a carbon radiator slam panel as the angle of the slanted bonnet was causing contact and damage to the slam panel.

So with some persuasion and lots of sweet talking, managed to persuade by Bro David of SR Composites to specially design a bonnet to meet Senior's demands. Due to budget reasons the bonnet is not 100% carbon. The decision was taken to design a special mould to create a hump on the bonnet similiar to the HKS TRB-02 carbon bodied EVO to clear the engine. Due to copyright reasons I unfortunately can't publish the picture of the HKS TRB-02's bonnet and hump.

For cost reasons the hump was moulded separately rather than incorporated into the entire bonnet mould for the HKS race car.
Pix of the nearly finished bonnet. The master plug to make the hump for the bonnet can be seen. I worked on the other bonnet but it ended up on my Bro's car. Currently working on another bonnet for myself sans hump of course.

Picture of the bonnet fitted to Senior's car. As can be seen from the picture the bonnet sits flush on the fenders and is not raised. Stupendous fit and quality. Do compare this bonnet with the likes of Varis and C-West. Finished bonnet weighs approximately 4.5kg vs 14kg for stock steel bonnet. Bonnet pins are not required (track tested by Senior) but encouraged for additional safety. The bonnet incorporates the stock double latch and also all the required fittings for the stock rubber seals. Pictures of the underside to follow once Senior stops staring at his bonnet and bothers to take some pictures for me.

Closeup of the hump. Fasteners are stainless steel. Look at the quality and straightness of the weaves. Pre-preg?

Thursday, January 12, 2006

Tokyo Auto Salon 2006

Tokyo Auto Salon 2006 starts tomorrow (1/13). More details at
http://www.e-autosalon.net/tokyo/index.html

Rapfix II Quick Release Steering Boss

Have been looking for a steering boss extension for quite a while as I tend to sit too forward for comfort but if you move too far backwards there's not enough leverage as your arms are extended too much. Most normal human beings have relatively short arms and longer legs but not the other way around.

My original intention was to get the R3 steering boss spacer but one JDM project car recently really caught my eye. This was the Jun EVO9 and it had a trick Worksbell Rapfix II quick release steering boss extension kit. Prodrive Japan and also Top Secret utilize the same kit anodized to their colour specs. A quick release steering boss kit will enable you to remove your steering wheel in a couple seconds. This helps for security purposes and of course the whole idea spells race car. Fnarrrr..

Some quick measurements indicate that the Rapfix II would be near perfect for what I'm looking for. Picture courtesy of Worksbell Japan webpage. I've decided to use my stock Momo steering boss and just bolt the Rapfix II to it. For those that want a shorter extension, Worksbell do sell shorter steering bosses but these are hugely expensive. Blame the strength of the Yen vs the Malaysian Ringgit.

Now I'm sure the number one question by now is why I didn't go for the Arospeed replicas that are widely available locally? These are approx 5 times cheaper than the Rapfix II. Well for one thing I prefer the original and not a "replica". Second this is the second generation improved Rapfix II system and not the original Rapfix which the Arospeed unit is based on. The advantages the Rapfix II have over the Rapfix are :
1. Less weight The Rapfix II weights 516 grammes vs 690 for the Rapfix. No idea on the Arospeed's weight as I've not managed to weigh one.
2. The installation action of the Rapfix II is only 1 step compared to 3 for the Rapfix. Put the steering wheel in the same position it was removed from and push it forwards to lock. No need to press the release button and pull back the sleeve as the Rapfix II has an auto lock spring sleeve that automatically locks once the correct steering wheel position is reached.
3. The Rapfix II utilizes the latest cold forging A5056 aluminium alloy. This means more strength.
4. The quality of finishing is also way way better compared to the Arospeed (which it should be considering the price different). You just have to put both steering bosses side by side and the differences are immediately noticeable.

With this in mind I contacted my Jap 'works' part supplier and a unit was at my doorstep in 4 days. Picture below of the kit. As you can see it is a true 'plug n play' item and even utilizes the stock horn function. I've decided to go for the red coloured kit. The kit is also avail in silver and black.

Picture below of male and female halves disassembled.

Installation was a zilch and took no more than 45 minutes total. Some slight grinding had to be done on the horn plate to allow everything to fit properly. If this is not done there will be a 1mm gap between the Rapfix II and the steering wheel. The problem would differ per the various steering wheel make and models. A fellow Bro is running an Arospeed unit and he also had to modify the horn plate to fit his Momo's horn. Close up picture below of the installed unit.

Another picture of the installed unit

Picture of the removed steering wheel. Looks trick eh?

Close up of the female half attached to the steering wheel

The only downside apart from the stupendous price is that your fingers are no longer able to reach the steering column stalks unless you have long fingers. Takes some getting used to but I mastered how to activate my signal lights in a couple days. If you're not used to this your fingers will be trying to move thin air.

Tuesday, January 03, 2006

Fuel Rail Supply Line Conversion

Ever seen those trick works racecars out there with braided hose and AN fittings for everything? I'll publish an article later on the intricacies of AN (Army Navy) fittings and the various type of braided hoses in the market later but for now this article will concentrate on the convertion of your fuel supply line from petrol filter to fuel rail.

Pls note that I had a lot of help from Jeff Lucius's excellent web site article on such a conversion for the Mitsubishi GTO (US market Dodge Stealth and Mitsubishi 3000GT). Jeff's web site can be found at http://www.stealth316.com

Picture below on the stock fuel supply line and hose parts required for conversion

Before beginning this project you will need an adapter for the fuel rail end. There are an abundance of adapters in the US market meant for the 4G63's/6G72's fuel rail but :
1. I'm not sure if they'll 100% properly fit on our stock (4G93)fuel rail
2. Most of the US speed shops were not too interested in doing business with me nor the patience to properly respond to my email queries

and most of all
3. These same shops were charging an exhorbitant price for the adapter and shipping. Imagine paying RM350 for one adapter.

With this in mind I had my adapter custom manufactured. The adapter was milled from 6061 aluminium alloy and anodized black. As you know anything custom manufactured is not a one off so I had to order a set of 10 (smallest order quantity). Some of my brudder's have taken a few sets but I do still have a couple left (RM85 per adapter). If you're interested do contact me at my email - llsaw1@yahoo.com.

In addition you will also need the following:
Adapter for fuel filter. If you are using the stock 4G93 fuel filter (same as most other Mitsu models including 6A12, 4G92, 6G72, 4G63, etc.) the thread size and pattern for the filter end is M12 X 1.25. The Mitsu/Proton part number of the filter is MB658689. You can also custom manufacture an adapter yourself if you so wish but there is an excellent option avail cheaply from the market which is the Earl's replacement adapter (Part No: 991945. Straight M12 X 1.25 to -6 AN male). This adapter incorporates an o-ring for better sealing characteristics.

You will also need bout half metre of braided hose. Any hose from the market (Earl's Aeroquip, Goodridge, Icore, XRP, etc.) will do but make sure you use the end fittings meant for said hose from the same manufacture. Per my understanding they are not interchangeable. They might be but you don't wanna take any chances as far as petrol is concerned. I have decided to use with all kinds of fuel out there including methanol. Most people including the Jap speedshops would use synthetic rubber nitrile lined hose such as the Earl's Perform-O-Flex hose but I'm not convinced these hoses will fully withstand our Malaysia petrol in the long term. These hoses are not susceptible to the MTBE agent used on some fuels and have been known to sour and emit smell after a while. Please note that a -6 AN sized hose should be sufficient for our application for up to 350+ horsepower. Please also note that if you go to a -8 AN sized hose, you will require totally different end fittings and adapters.

And of course you will also need a -6 AN 90 degree end fitting (Part No: 6091-06)and also -6 AN 45 degree end fitting (Part No: 6046-06). Pix of hose, end fittings and fuel filter adapter below

You can order the hoses and end fittings from most speedshops in Malaysia such as Pentagon Enterprise, N1 Racing, etc. Alternatively they are also widely avail via mail order from the likes of Demon Tweeks and even eBay. Your preference.

I also ordered some alloy spanners from Earls and Goodridge. These alloy spanners are required if you do not want any unsightly scratches caused during assembly on the end fittings. Picture of the spanners and assembled hose below. Assembly instructions of the various types and makes of hoses are different

Picture of the Earl's adapter screwed on to output end of the fuel filter. Note teflon tape is not needed due to the excellent seal on the Earl's adapter's o-ring.

Picture of fuel line test fitted to adapter on fuel rail end

Picture of the complete assembly test fitted


Installation
1. Disconnect battery
2. Remove air filter and piping assembly for easier access to fuel filter.
3. Remove stock fuel supply line from fuel rail and fuel filter. Do note there will still be some pressure in the fuel rail so do use a rag to soak up the excess petrol coming out once you have removed the line.
4. Remove fuel filter (optional, if you are changing fuel filter. I took this opportunity since this saves on the labour and effort).
5. Install the fuel rail adapter on the fuel rail. Remove the o-ring from the stock fuel supply line and install it to the adapter. Applying some engine oil during this process helps. Carefully push the adapter into the fuel rail, line up the 2 bolt holes and tighten the bolts. Installed pix below

6. Install fuel filter (optional) and adapter
7. Install the new braided fuel line. Pls note that you DO NOT require teflon tape or sealant for AN fittings. I have seen people doing this and honestly it sucks from an engineering standpoint. The threads themselves never seal in AN connectors but the tapered ends (cone) of the fittings does. Plus the sealant could get into your fuel rail and clog up everything. Picture below of completed assembly.

8. Make sure you double check everything is connected and fittings tightened. Reassembled back the air filter and piping assembly.
9. Reconnect battery
10. Start the engine and pray there's no fire (just kidding). Another pix of the completed assembly.

I'll be doing an article of the fuel pressure regulator end conversion later when I'm up to it and when most importantly budget permits.

Jack's Battery Relo

As promised, here's the work done by my bro Jack and some nice pixs. Text courtesy of the man himself..

Here goes for my battery relo a few days ago. What you will need is:

1) Junction Box of any variety or make. Even a good empty plastic box will do!
2) Insulator
3) A mount

Simply, mount the mounting for the insulator on where your battery used to be, screw on the insulator to insulate the Positive terminal from the car body. Proceed to bolt the junction box and other fuses to the insulator and viola you're done. The junction box will provide you protection from the elements as well as any accidentle contact with anything. I choose this junction box as it has the "+" sign on in. As you can see later, it also provided me with space to house my fuses for the upgraded lights wiring. A simple jobbie that should take an hour or two.

Battery was moved to the rear.. its still boggling me as to why I choose the driver side and not the passanger side. Will correct that later.

I personally felt that this is a simple any yet a superb mod. Battery was moved to the rear, cooler and thus lasts longer. Weight was also transferred to the rear and with the removal of my humoungus 14" Spare tyre which I cant use and dunno why I kept it for the past 5 years .... another mystery of the deep. Maybe its just me, but I was kinda breaking later going into turn for the earlier part of the trackday and car seems to have better turn-in and performed better. Either that or I'm getting more confident. Anyway, here are the pics

All power points with fuses for the lights

It even comes with a Jumper Rod for any emergency? Cool

Here's the fat ass

Sunday, January 01, 2006

Happy New Year!

Happy New Year Everyone!!!

Gosh.. 2005 is already over and 2006 is now upon us. The SP is 6 years old now and still in it's infancy in terms of mods. So much for trying to beat the Japs!!! Below's the final 2005 spec for the SP

1 Engine
1.1 Ralliart engine oil cap
1.2 NGK Hyper Silicone Power cables
1.3 NGK Iriway 7 spark plugs
1.4 K&N air filter injection kit
1.5 Samco Sport coolant hoses
1.6 4G93T inlet manifold ported and port-matched
1.7 60mm throttle body ported
1.8 82mm bore 4G92 Pistons + piston rings
1.9 All bottom end rotating assemblies fully balanced and blue printed
1.1.0 Z. Speed adjustable cam pulleys
1.1.1 Power Enterprise Super Strong timing belt (Kevlar)
1.1.2 Matspeed blue printed 4G93T engine block
1.1.3 Matspeed race ported cylinder head
1.1.4 Hegami metal head gasket
1.1.5 Matspeed 3R 292 (inlet) and 288 (exhaust) spec camshafts
1.1.6 WRC Motorsports fast road engine mounts (left and right)
1.1.7 Ralliart Group N lower engine mount (front and rear)
1.1.8 Cusco Oil Catch Can
1.1.9 Goodridge 200 Series lines & hose finishers (Oil Catch Can)
1.2.0 Ralliart radiator cap
1.2.1 SR Composites carbon spark plug cover
1.2.2 SR Composites carbon timing belt cover
1.2.3 SR Composites carbon radiator "slam" panel
1.2.4 SR Composites carbon upper radiator support bracket

2 Fuel System
2.1 Goodridge 600 series hose & AN end fittings (fuel supply)
2.2 AN #6 adapter for fuel supply line (fuel rail)
2.3 Earl's AN #6 adapter for fuel supply line (fuel filter)

3 Exhaust System
3.1 Proton Motorsports R3 Stage3 competition exhaust header
3.2 Exhaust B piping incorporating Hot Bits resonators
3.3 Apexi N1 rear exhaust muffler
3.4 Ralliart exhaust hangers

4 Electronics/Engine Management
4.1 Matspeed J5 ECU

5 Chassis/Steering/Bodywork/Aerodynamics
5.1 Autofoam automotive high density foam (side rails + A pillar)
5.2 SR Composites carbon strut bar - front
5.3 Hot Bits aluminium strut bar - rear
5.4 Mitsubishi CP/CT9A Lancer EVO5-7 boot reinforcement bar
5.5 Proton M21 Export spec front grill and mark top
5.6 Mitsubishi CA4A Mirage Asti MIVEC rear high spoiler/wing
5.7 Superpro steering rack bush kit
5.8 SR Composites front and rear number plates
5.9 SR Composites carbon front bumper lip tow hook cover
5.1.0 SR Composites carbon pillar garnish
5.1.1 SR Composites carbon wing "gt" mirrors
5.1.2 CPS carbon/frp bonnet
5.1.3 SR Composites carbon battery tray
5.1.4 Wiring and termination work to relocate battery to boot
5.1.5 Odyssey PC680MJ dry cell lightweight race battery

6 Interior
6.1 MOMO steering wheel boss kit
6.2 Worksbell Rapfix II quick release steering boss kit
6.3 MOMO Corse Model 78 steering wheel
6.4 SR Composites carbon shift knob
6.5 SR Composites carbon pedals

7 Suspension
7.1 Drummond Mototorsports (DMS) - Giant 50mm shock absorbers
7.2 Cusco front and rear top pillowball mounts
7.3 CE9A Lancer EVO2-3 rear upper and lower suspension links
7.4 Superpro PU front lower control arm bush kit
7.5 Superpro PU rear trailing arm front bush kit
7.6 Mitsubishi CE9A Lancer EVO2-3 rear lower arm
7.7 Superpro PU front anti-roll bar D bush - 23mm
7.8 Superpro PU front anti-roll bar link shoulder bush kit (X8)
7.9 Whiteline rear 18mm adjustable anti-roll bar
7.1.0 Superpro PU rear anti-roll bar D bush - 18mm
7.1.1 Mitsubishi CE9A Lancer EVO2-3 rear anti-roll bar link kit

8 Transmission and Drivetrain
8.1 Goodridge stainless steel clutch line
8.2 Exedy racing clutch (disc + pressure plate/clutch cover)
8.3 Jun forged chrome molybdenum lightweight flywheel
8.4 Kaaz Powerpot series 1.5 way limited slip differential
8.5 CA4A Mirage MIVEC 4.592 final drive

9 Brakes
9.1 Goodridge stainless steel brake lines (front and rear)
9.2 Wilwood Dynapro 4 pot calipers
9.3 Wilwood Polymatrix E compound brake pads (front)
9.4 EBC standard Kevlar brake pads (rear)
9.5 DBA Longlife Slotted brake discs (front)
9.6 DBA Longlife GOLD crossed-drilled and slotted brake discs (rear)
9.7 Ralliart long hub bolt/lug (66mm)
9.8 12mm wheel spacer (front - to clear brakes)
9.9 Mitsubishi CE9A Lancer EVO2-3 1" brake master cylinder
9.1.0 Cusco Brake Cylinder Stopper (BCS)

10 Wheels/Tyres
10.1 SSR Type C 16" X 7" rims
10.2 Racing Gear forged 7075 aluminium alloy lug nuts
10.3 6061 aluminium alloy centre bore centering rings
10.4 Yokohama Advan Neova AD07 16" 205-45 series tyres

2006 will be very interesting as I hope to go fully programmable management. I also have on order a Koyo Type Z aluminium race radiator with 60% more capacity to hopefully resolve the cooling issues I'm having in traffic jams and when the air-con is switched off. 11.9 compression on 97 octane is not easy. Also in the works would be the conversion of my fuel pressure regulator lines to braided with AN fittings. Planning to use a SARD FPR. Stay tuned..

Battery Relocation to Boot

To have sufficient space for my upcoming carbon airbox I've relocated the battery to the boot. Since I don't run any bright bliking strobe lights or a stupendous megawatt ICE, system the decision was made to go for as small a battery as possible. I've chosen the Odyssey PC680MJ dry cell battery as it's popularly used by many race teams and fellow mod enthusiasts. The PC680 only weights 7kg vs 15+kg for your average NS60 sized battery. The MJ suffix stands for "Metal Jacket" for additional engine bay heat protection. As can be seen from pix below the battery is really teeny weeny being slightly larger than your everyday motorcycle battery


The Odyssey can be mounted on any position and also does not emit any corrosive hydrogen gasses unlike conventional 'wet' batteries. Downside of course would be price. I got mine really special but the retail price of these batteries is approx USD160 in the States to RM1K+ in Japan without shipping. Unfortunately there are no distributors in Malaysia so you'll have to mail order from other countries with the closest being Singapore or Australia. For those who want a larger size battery for more "security" do go for the PC925 model but do note that it's heavier, larger and of course more expensive than the PC680. I have decided to forgo the std non-daily automotive SAE terminals and have instead used the race M6 termination complete with tin end terminals. For those who still want the SAE terminals you can purchase the PC680MJT (Metal Jacket SAE Terminal)model which comes with the SAE automotive terminals pre-installed. Battery tray is carbon.

Power cable is the best 'thick n fat' welding cable (oranged coloured jacket with the very Ah Beng sounding "Dragon Welding Cable" printed on it's jacket) I can buy complete with an expensive sleeve made from hi-fi cables. Length of cable to buy would depend on your config. Some people route 2 separate cables for starter motor and alternator each. I've decided to use the same cable for both duties connected to terminated to the stock cable in the engine bay. Both positive and negative terminals are the same cables. The crimping and end cable termination was done by a hi-fi enthusiasts bro and is first class as can be seen from the pix.

The positive end was marked with a red band for quick and easy identification. You can always buy expensive power amp cables from the likes of Monster Cable if you have the budget and like the looks but IMHO they're the same in terms of performance in starting the car so it's puurely for the blong factor. At the moment I've secured the Odyssey's metal jacket together with the battery tray in the boot via self tapping screws with no clamps. The battery is in turn secured onto it's jacket via silicon adhesive. Unfortunately you'll have to drill holes in your boot. Additional hole is also required for the grounding. And do not forget to scrape away the paint for the grounding point. There must be bare metal to metal contact for the grounding to work effectively. Pix of the battery mounted in the boot

The stock front positive cable together with ABS fuse was left in place with the stock SAE terminals removed and carefully zip tied to the gearbox speed sensor. Care must taken to ensure no contact to any metal parts of the car unless you like a short. The negative ground cable was snipped off with a handy pair of scissors and the remaining cable to engine left in place.

The cabling was routed to the rear via the passenger (left) side carpetting at the side of the car. There are many access points with rubber gromets leading into the engine bay. You just have to remove one gromet and use a knife to cut away the centre section then thread the cable through it.

Another completed pix

A fellow petrolhead bro of mine by the name of one famous Jack Chooi aka "Jacko Whacko" aka "AlucraD" from TMM forum has also completed his battery relo work yesterday. I'll get him to publish a report of his work later if he's up to it.