Sunday, December 07, 2008

Rebuild

During HPC last week, I think I have spun a con rod bearing or damaged the bearings somehow. Mid way through the last session, the car started to make funny noises which I could not really hear with the helmet on. Drove into the pits, took off the helmet and my fears were confirmed, as I was hoping it was something else. Car is back in my place while I gather some parts for a rebuild. I will only know what really happend when the engine is stripped.
Hoping to rebuild it with slightly different parts and make slightly more power than before. The engine just before giving in made about 170+ whp with about 18kg of torque, which is not bad for the 4G93P without any Mivec or Turbo, and running on pump gas.
Lets see how it goes!!! Watch this space!

Thursday, September 18, 2008

HPC 30th November 2008

May not come as a suprise but I have now registered for a place in Gp 2 for the HPC event on the 30th November. It will be a full track event so I need to work on SP to increase more front end grip especially through T5 and T6 based on the previous track day experience. Plan to get SP corner weight'ed before the event, lets see whether I can fit that in my tight work and life schedule. FYI I have only clocked less than 5k km on the SP since purchasing it which is going to be about 2 years now.

Anyone else going for the HPC event on 30th Nov? Do drop a line as it will be nice to put a face to the name/nick on that day!


ARP Head Stud Kit

This is an important upgrade especially if you are running high compression or high boosting engines as to prevent head stretch.

Some information on the ARP studs :

"Obtaining the optimum cylinder head-to-block sealing is especially critical in small displacement engines employing high compression pistons or power adders like turbochargers, nitrous oxide and superchargers. That's why ARP® head studs are popular among leading Sport Compact/Import racers.

You should know that ARP® uses a premium grade 8740 alloy that is rated far superior to "aircraft" quality. Then, each stud is precisely heat-treated to 200,000 psi. Following heattreat, each stud is centerless ground to make it as close to perfectly concentric as possible. This procedure involves about ten very slight cuts and results in an exceptionally straight part. It's important to note that lesser quality studs are not even centerless ground—the material is thread rolled in bar stock form (mostly before heat-treat, when the material is easier to machine). Because ARP® studs are manufactured to such exacting tolerances, you will note that gaskets and cylinder heads literally glide into position and are perfectly aligned—something that won't happen with inferior quality head studs.

ARP® studs are thread rolled after heat-treat, which gives them about 1000% (that's ten times) better fatigue strength than those studs that are threaded prior to heat-treat.

You will also note that ARP® offers specially undercut studs for several engines. This procedure (done only to the shorter studs) more equalizes the "stretch" of both studs, which makes for a more consistent clamping force—one that compensates for head gasket compression when the head is installed. This helps prevent blown head gaskets, and assures optimum sealing!

Premium parallel ground washers are also included with each kit." Article from ARP website.


I bought this kit from RPW directly when I was in Perth. RPW are famous in Australia for the performance modifications on Mistsubishi's especially the older models. It was not cheap at AUD 295.00 for the head stud kit alone!

Some pictures:


The kit come with the stud, bolts, thick flat washers , ARP molybdenum assembly lube, installation guide (torque settings) and ARP sticker. ARP provides their own default torque values which is much higher than the manufacturers recommendation. This provides better sealing between the head and the gasket and ultimately much better reliability.

Monday, August 11, 2008

HPC 20th April 08

This should have been blogged sometime ago but I have been quite busy. This was my first time on the SIC track and my first HPC event. I registered for the Gp 2 morning session along with a few other friends - Khai in his x-147 2.0 Selespeed, Ken - x-AE86, CP - in his Satria 1.6 Turbo, Jack - SGTI 1.8 Turbo and Senior - SGTI 2.0 Turbo. My wife also decided to come and support me for the day.

The day before the event, I got the car aligned and the camber set to -2 degrees on the front and -1 deg at the rear. Also filled up the tyres with Nitrogen and set it to 32psi on all fours. Set the Ohlins to the recommended track setting and removed the rear seats for further weight savings! On the engine front the car was not in its ideal condition as I had a head gasket leak which at high revs causes some oil and coolant (only realized this at the track) to leak. So best to be cautious and I imposed a self rev limit of 7.5k rpm.

Jack's day started with a intercooler hose coming off just before arriving at the track. This was quickly fixed and all of us got into fixing the stickers which were provided. In Group 2 I think there were about 30 cars, RX7, RX8's, Impreza's, Satria Neo, Civics, old skool Saab and a few others. Feeling all jittery about the track and the car, I was taking it easy for the first few laps just to familiarize with the track and SP. After getting comfortable I started to push on and started to push the car more by braking later and trying different lines on the turns. So much so that at one point got too excited with my braking points and overcooked turn 9 while Sr was in the outside line and I was heading straight on to a RX7 which was halfway into the turn. Luckily I was able to keep things in check (thank you God!) and managed to avoid any incidents. I pulled in early to check the conditions under the hood and during that time was told off by the marshall that I cannot perform late braking and overtake on turn 9. Oh well, only if he really knew what happened.

Anyway it was a great outing for me and the SP and the car handled brilliantly on the track although it was smoking quite a lot, esp when I heel n toe into a turn, SP was emitting big clouds of white smoke from the exhaust. After the track day a top overhaul was required as the head gasket was on the way out and as well as the valve guides and a few other items which needed replacing. Jacko ended the day with a lil problem as well as his main relay gave way and was not able to start the car. Luckily his mechanic was there to watch the event and was able to make a quick fix. Well I will let the pictures do the talking.
Getting ready to go on the track. No more CF bonnet..sob sob!
Lining up at the pits

CP's Gangster Green Slutria

Jack and his playstation, the SGTi of course!!


Cooling down after the first session - corner markers on the tyres were full before first session, now totally gone!

Khai's 147 Selespeed! Now replaced with a different turbocharged monster!

Seniors freaking fast GTi

My reminder!


Blasting through the straights

Another shot different angle

Me, wifey and SP after the track day!

Saturday, August 02, 2008

V Sixers Track Day 30th July

I was trying very hard to get myself registered for the trackday event organized by Vsixers through the SGTI club. After a couple of weeks of trying and my itch to have a go at the full track becoming more intense, I decided to just go to SIC and try my luck. The gods of track days must have been shining on me as I managed to get SP in for the event. Also thanks to Jack who was helping me out all the while!
There were about 30 Perdana V6, 8 Satria GTi, 5 Savvy, 15 Neo's and 1 Putra all ready in the pits raring to go. My first session on the full track was a bit boring, I didnt feel right, the car wasnt feeling right too and not too long into the first session I had my first spin in the SP on turn 10 which happens to be one of my favourites since HPC track day. I also attribute this to my own mistake as the day before the event I decided to swap the tires from rear to front and vice versa, which left me with tyres with more tread on the front and lesser treads at the rear. This in turn reduced the grip on the rear which made it more oversteery! I kinda "woke up" after the spin and decided to head to the pits to calm down a little. Checked tire pressure and dropped the front a little and the car felt much better on the next sessions.
The car felt a touch oversteery on turns 5 & 6 which are the high speed left and right and reckon some aerodynamic aid to get more downforce will be beneficial. The brakes performed well and the only trouble I had was a loose dipstick. This made me to loose some oil and dirty the engine bay. Managed to get some duct tape from one of the SGTI members (thanks man!) and did a quick fix to the dipstick.
It was good experience for me and to learn SP's handling limits in a safe environment. I still have a lot to learn in terms of being more smooth and consistent with my lines, braking points and turning points as its my first time being out on the full track. Nevertheless the day did have some incidents like a Satria Neo crashing into a wall and Jack's car stuck at the pit entrance which resulted in red flags being shown. We had to wait for about 10 mins before the track was OK to be used again.
Oh on the way home there was a rattling sound coming from the rear which I thought was due to a broken suspension/arb link but found out that bolts holding the rear boot hinge has managed to work out loose due to all the shenanigans of driving in the track!
Sorry no pictures!

Tuesday, July 15, 2008

Jack's Coil on Plug Setup


Jack's new R&D project. Article written by Jack himself.

This just installed over the weekend.. suppose to be a straight forward install since the boot fit perfectly to the engine head. The tricky part was sorted out i.e. the mounting plate. Since I did not know if this will work the aluminium mounting plate was not sent for lazercutting. It was done the old fashion was via a saw and a filer.

Where the coils came from

The install came down to making sure the wiring was done properly. As usual my Mech boasted that he can do this with one eyes closed. I complied and went on my business painting the cam cover. Lo-and-behold when we started the car it misfire and stumble badly during boost.... The problem with COP install began to creep up on me from posting on the net. There were issues on no rpm readings, low idle misfire to WOT high boost stumble and incorrect dwell time setting. My mech said I needed to retune the car. Feeling shitty, i went home disappointed and contemplate to GT auto or go back to the OEM ignition. After spending hours on the net. I figured that my mech did the wiring wrongly. He wired the coils in parallel instead of in series. In parallel the direct 12v to the coils lowered the resistance and caused the ignitor or Power Transistor Unit (PTU) to go haywire. The car in-turn will misfire, stumble and rpm readings will go nuts. Lancerregister and various DSM forums advised to rewire it in series and to their diagram and also regap the plugs to 0.026in or 0.6604mm.


The correct wiring diagram
I ask mech to open shop yesterday and we proceeded to make a rough wiring diagram from spare wiring lying around the shop. The car started and it idle like a dream, RPM works and no misfire at boost!! Home run!! Tested the car and did not notice and power differences. As expected, since I'm still having the wasted spark ignition system. A COP just replaced the 2 coils with 4 and no plug wires. I only notice that the car idle smoother and pulls harder. This is probably due to the fact that my old chop shop coils are badly worn or its just the new toy talking. Instead of 'chopping' another set for the yard. I might as well get 4 coils for the same price. You do have to pay extra for the shipping and fabricating the mounting plate. They came with all the wiring, sockets and boot. You just need to wire them and fabricate a plate to mount them. The Supras, DSM and Mitsubishi community in yankee land have been doing this for years. This is the final result on a 4G93T:


The wiring was done nicely. All covered and connections was soldered and shrink wrapped. I even had my mech build a 3pin connector to my 2 Nology coils. So instead of splicing into the wiring it will just be a clean snap on with the connectors.


There are still arguments on its actual performance gains. Some say its a waste of money and some say its wort it. But the consensus is that this is only worthwhile if you have
1) Standalone ECU that can control the coil dwell time and
2) that can also do sequential.
3) You will be going CDI
To me the way it looked alone is worth it and if I wanted to I can go 2 & 3 via the Haltech ecu and a CDI box. The COP do run a lower coil dwell time as they arguably have lower resistance. The dual coils on the OEM takes longer to charge. My previous parallel wiring probably lowered resistance to much and cause the of the coil to discharge prematurely causing the engine to misfire and messed up my RPM signal.
According to my Haltech Manual, the typical settings for dwell time for dual coils are 3.5ms and COP 1.8ms. I will have to adjust that later to ensure that the coils last and don't burn itself from being overcharged. I'm impressed how the coils fit the 4G93T head and plugs without much fuss and how the engine bay looked now. I think its worth-it although no performance gains now but I'm sure the coils worked better than my dunno-how-old-beat-up-chop-shop OEM coils that are beginning to leak.


Monday, July 14, 2008

Earl's Oil Cooler

As it is vital to keep the engine oil temperature in an optimum level, especially if the engine is producing a lot more horsepower and running very high compression ratio, I decided to install an oil cooler on the SP. Luckily or unluckily my work requires me to travel frequently and I happen to discover the Earl’s distributor in Sydney. With help and guidance from Jacko I purchased the cooler, mounting bracket ( in aluminium), Earl’s AN fittings and the SS braided hoses. I even got a set for Jacko as well for his wild GTi! Jack also helped to source out a sandwich plate with built in thermostat made out of cast aluminium from the US to complete the install.

The list of part which was required:

1x Earl's Oil Cooler 12x5x2, 16 ROW, -8AN
1x Earl's Aluminium Oil Cooler Mounting Kit for 16 row
4x Earl's -8 to 3/8 NPT adaptor
4x Earl's Swivelseal -8 90 deg hose end
Earl's Autoflex -8 hose approx 2meters
Mocal Aluminium Sandwich Plate with Thermostat

The cooler with all the fittings and brackets minus the hose and sandwich plate

Close up of the Earl’s 16 row oil cooler


Sandwich plate in place with fittings and hoses.

Another view

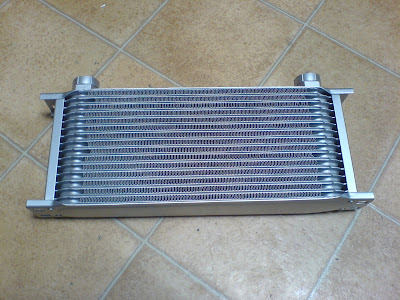
Cooler installed (All fasteners were changed to Aluminium Potassium Bichromate soon after)


View with the bumper installed.

As I don’t have any gauges to measure the oil temperature or pressure YET, I am not able to ascertain how well this setup works, but since installing I have gone for one track day session and the car performed very well without any oil or coolant temperature problems.


I also bought a set of Earl's AN spanners to ensure that the fittings and hose ends do not get damaged when installing.


Earl's Wrenches for AN fittings. Not cheap at about AUD 35.00 per piece.

More to come soon!


Tuesday, June 24, 2008

Koyo Aluminium Radiator


Decided to go for the Koyo Aluminium radiator to solve some of the cooling woes especially during heavy traffic. Installation was fairly simple and straightforward and I did it at my house by myself. Just had to be careful with the clearance between the massive headers and the aircond fan. Pictures are self explanatory. Also installed SAMCO silicon radiator hoses and Ralliart 1.1 bar radiator cap whilst fitting the radiator.


Engine bay with the standard radiator, radiator cap and hoses.


Another shot but side view


Engine bay with Koyo, Ralliart radiator cap and Samco Hoses


Side View with Koyo Radiator Installed


Another Shot – Last one I promise


The water temp only goes to half now during massive traffic jam especially on a very hot day. Usually its below the half level mark. Radiator fan also take a very long time before it kicks in and stays on just for a short while. Next step will be upgrading to the Ralliart Thermostat to try and get the fan coming on quicker especially during heavy traffic. Do remember that air-con must be switched off during traffic jam which means the aircond fan doesn’t run and less cooling through the radiator.


Latest Engine Bay Shot


Next Mods

Oil Cooler Kit
Crank Scraper
ARP Head Stud Bolts
Sard FPR.
Earl’s Fuel Filter
Complete Fuel Line conversion to SS braided hoses with Earl’s fitting and hose ends


Stay Tuned for more when I have the time.

Monday, June 23, 2008

A New Era


I thought I will just make a quick update on the SP since it has been a while since the last entry. I have now clocked in about 1200 km since I purchased the car from Andrew. Nothing much has been done to SP except for the addition of a Koyo Aluminum Radiator and the Ohlin Coilovers. The DMS suspension was one of the items which I did not manage to secure when purchasing the car, so I had a good offer for a set of Ohlins from Japan. This was soon bought and fitted as the car looked "funny" on the standard suspension, ie huge ass suspension gap between the tire and fender especially on the fronts.


Picture of the SP on jacks just before changing to the Ohlins.


The other side with the Ohlins installed.

Unfortunately the pictures of the Ohlins before they were fitted were only taken through my handphone and they are not very good quality pictures.

The specification of the Ohlins:

Short Stroke Ohlins PCV for Lancer Evo 1,2,3
Front) Free length =200 mm, k=8 kgf/mm
Rear) Free length=200mm , k=6 kgf/mm

20 click adjustment for compression and rebound, not individually though.

Pillowball top mounts front and rear


Installation was fairly straightforward and installed it myself with help from a good buddy of mine, thanks Koh!. I must say that where the installation work was done the SP was actually the thorn among the roses!

Driving Impression

To be honest I thought the ride is going to be really stiff and jarring, but the damping of the Ohlins is really good so much so that its actually quite comfortable to be used daily. At least the SP is more comfortable then my Mini but that’s another story though!

I have wound the dampers to about 12 click from Max on the fronts and 15 clicks on the rear which is inline with Ohlins recommendation. The car was then aligned with front toe out of 1 deg and rears toe in of 1 deg as well. Cambers on the front were set to -1 deg. Potholes and speed humps are best avoided as the short stroke nature of the damper doesn’t really help in providing any form of comfort during these situations. However show it a good set of twisties and they really shine! High speed corners and highway ramps can be taken easily without any under or oversteer. The setting is very neutral and gives a high degree of confidence. All this is pretty much with the first try on the suspension setting. I need to play around more with different ride height and compression setting to really find out what it can do.

The SP has quite a lot done on the suspension and handling department already so the effect of the coilover is greatly multiplied I reckon. It’s akin to having porting work done to the cylinder head before a set of killer cams is fitted. Next step is to get the car corner weighted so that I can really benefit from the coilvoers.