All,
My apologies for the long delay in posts but I've been swamped with work and my new house. With great sadness and also happiness I'd like to announce that the SP has been sold and the new owner has already taken delivery of it. The monster is already roaming the streets of the Klang Valley as we speak. I'll let the new owner introduce himself in due time but suffice to say he is a car mod enthusiast and bought the SP nearly lock, stock and barrel. Mr MB already owns a trick car and has exciting plans to continue the development of the SP. I'll be sticking around this blog and should also be starting another soon on my Sentra. The N16 Files will however be more on general maintenance, ICE and oldie comfort (shudder) mods rather than all out performance. Getting a bit grey unfortunately. Stay tuned...
Sunday, November 19, 2006
Tuesday, August 22, 2006
Time to Move On
It's time to move on. I'm selling the SP and it's parts. Price of car would depend on specs wanted with it. Asking for RM35K for base car complete with 180+hp engine, some cf stuff and full superpro bushes, complete rear evo suspension
arms. Price of parts for sale.
Full carbon bonnet. 100% cf with no csm layer. Weights
4.5kg including frame. Stainless steel hook catch –
RM3K
Full carbon GT side mirror – RM500
Full carbon spark plug cover – RM200
Carbon timing belt cover – RM300
SSR Type C 16” X 7” wheels complete with Advan Neova [SOLD 30/8]
AD07 205-45 series tyres – RM3K [SOLD 30/8]
Racing Gear 7075 aluminium alloy forged lugnuts (16 pieces) – RM250 [SOLD 30/8]
Wilwood brake kit. Includes Dynapro calipers, wildwood
pads, brake hose + end fitting, caliper adapter and
12mm space – RM3.5K
Works Bell Rapfix II quick release boss kit – RM650 [SOLD 31/8]
Momo Corse Model 78 steering wheel (leather) – RM350 [SOLD 31/8]
Kaaz Powerpot 1.5 way plate limited slip differential
– RM2K. RM3K if include MIVEC gb and Jun lightweight
flywheel
Rear Whiteline 2-way adjustable GTI-spec anti-roll bar
(18mm) complete with Superpro D bushes – RM500
Rear Hot Bits strut bar – RM100
Front carbon strut bar with CNC machine aluminium
alloy end mounts – RM850
Carbon R3 shift knob – RM100 [SOLD 25/8]
Cusco brake cylinder stopper – RM200
Cusco oil catch can complete with Goodridge 200 series
hoses and Goodridge hose finishers – RM350
DMS 50mm WRC Group N spec dampers. 2 way independently
adjustable (20 for compression and 4 for rebound)
complete with Cusco pillowball aluminium plate top
mounts and DMS adapters – RM5.5K [SOLD]
Samco radiator hoses – RM200 [SOLD 31/8]
Carbon slam panel - RM200 [SOLD 25/8]
Ralliart engine oil cap – RM200 [SOLD 1/9]
Ralliart radiator cap 1.1 kg/cm – RM90 [SOLD 1/9]
Odyssey PC680 MJT battery including carbon battery
tray, wiring and termination – RM550
If you want the engine, find me a stock decent 4G93P engine, ECU and add in RM2K
Price negotiable. Serious enquiries pls contact me @ llsaw1@yahoo.com. And I really mean serious enquiries. Selling things on the net is becoming a big hassle nowadays. Lotsa emails for pixs requests, etc, etc and that's it. Also I know the market price and what I'm offering. No offence but contact me only and only if you can really afford. Also if you have a counter offer pls make it reasonable. Do not waste my time and yours. As an example one person tried bring the price of my Sentra's less than 2 month old CD MP3 head unit to RM150 when a brand new set will set u back bout RM600+.
So the answer to WHY?
1. I barely have time nowadays to mod or run the SP. Only ever run the SP during weekends. Mileage is down to about 30-40km per week.
2. I don't really have the excess cash to justify playing around with 2 cars. Make that 3 if I include the other half's Optra.
3. Getting really disillusioned and sick with having to do nearly every other mod myself and with the local mod industry. There's still no dyno today in Penang so this means any engine mods means a trip down to KL. I've also been waiting for some development parts for close to a year.
4. To really further take the SP to the next level would require big big bucks. Something which I can ill afford as I have a semi-d house which I need to furnish and renovate. That should nicely take up all my time and finances for the next 6 months or so.
To sum it all up time is catching up fast. I'll continue this blog to the best of my ability as I still have lotsa remaining articles to write. Plus the development continues as my bro Jack is getting some of the SP's works parts and is continuing to push the barrier! Finally to all you fellow Proton Wira, Satria, Putra & GTI/SR3 enthusiasts out there I would like to thank you for all the compliments. You guys and gals (I hope) have been wonderful. It's been great running this blog. Keep the mods coming.
Friday, August 04, 2006
Race Tech Magazine Braking Upgrade Calculator
The link below brings you to a very nifty Microsoft Excel spreadsheet which automatically calculates your braking requirements and upgrade to generate the ultimate stopping power you aspire to. The tool even calculates for you the weight transfer under braking for your car, how much stopping power you are generating at each end of your car and even possible caliper piston sizes vs master cylinder ratio. So if you even wondered whether this 10 piston caliper with 40mm diameter pistons and 350mm diameter rotor will suit you car with a 1" master cylinder use this tool. Fab stuff! I spent countless time playing with the thing.
Race Tech's Braking Model
For starters try this. Stock GTi/Putra uses a single piston sliding caliper with a 54mm diameter piston, 256mm front rotor/260mm rear rotor and 15/16" or 23.8125mm master cylinder. The EVO1-3's twin piston caliper uses twin 42.9mm pistons, 276mm front rotor/260mm rear rotor and 1" or 25.4mm master cylinder. First person to calculate the difference in piston area for the Putra vs the EVO1-3 and the disc/rotor torque on one wheel assuming both use the same coefficient friction pads wins a free teh tarik from me :)
And pls.. Getting your stock rotors drilled will not give you more stopping power. Period! It will only make the shop drilling your rotors richer at the expense of your money.
Ralliart Engine Mounts
Most petrolheads get excited when “glamorous” mods such as turbokits, bodykits, gt wings, cams, intakes and exhaust are being discussed. Tell them you just spend a couple hundred bucks on engine mounts and the exclamation would be “WTF!”
Like suspension bushes, the engine mount is an indispensable part of a vehicle. It’s simple function is to attach the engine to the vehicle at it's designated position while eliminating vibration and unnecessary engine/gearbox movement. If you’ve got 25% or more additional power from the engine it’s time to look for stiffer mounts as the stock softy mounts are probably way past their limit. And no you won’t get 25% more power with just an intake, header and exhaust. If you persist problems such as broken engine mounts and exhaust will occur in due time. This is due to too much engine movement as the stock mounts are unable to control the engine movement. Having previously broken my exhaust twice due to too much engine movement I can tell you this fact is true.
I was originally using the WRC Motorsports upgraded solid engine mounts but these do not last. The bottom mount cracked in less than 3000km! The term “solid” means there are no gaps or holes in the engine mount’s rubber leading to a stiffer mount. Have since upgraded to Ralliart engine mounts for the 2 bottom engine mounts while retaining the WRC Motorsport mounts for the other 2 top left and right engine mounts. The 4G93 uses 4 engine mounts to hold the engine to the chassis. The are 2 at the bottom controlling longitudinal movement (front and back) and 2 on top at each side of the engine controlling transverse movement (right and left). This mounting config is the same for all variants of the 4G92 and also the 4G63 EVO1-3. The Ralliart Group N engine mounts are made from HS80 rubber for the bottom 2 mounts and HS90 rubber for the top 2 mounts. They are very hard. My advice for most people is to only upgrade the bottom 2 while retaining the stock for the top 2. If you’re a sucker for punishment or have a vibration fetish you can go for all 4!
Picture below of the Ralliart front lower engine mount (Part Number RA581297K1).

Picture below of the Ralliart rear lower engine mount (Part Number RA309269K2).

As you can see from the pixs above these mounts are really beefy and hard!
The part number for the top 2 mounts is RA871602K1. The part number is the same for both (left and right) mounts. Do bear in mind the Ralliart engine mounts do not come with the mounting brackets so the stock mounts will have to be pressed-out of the stock brackets and the Ralliart mounts pressed-in in place. I elected to buy new stock engine mounts complete with brackets as these are fairly cheap. Dutifully sandpapered the stock brackets and had them resprayed in matt black. With the new mounts installed engine movement is totally minimized under hard acceleration and shifting. The other positive side effect is quicker shifts as a result of the minimized engine and gearbox movement. The downside to all this would be even more vibration at idle but hey if you’re on big cams big deal! If you want less vibration try something softer like R3 engine mounts. I would stay away from the WRC Motorsports engine mounts (at least for the bottom mounts) as they don’t last. A flashy engine damper might make the engine bay look racier but they cost more (the branded ones at least) and the effect is not as good. Nothing beats upgraded engine mounts IMHO. Also if you’re curious, race-only cars run aluminium/metal engine mounts.
Sunday, July 09, 2006
Got Roll? Upgrading the Anti-Roll Bar
The Putra runs a pretty archaic and basic anti-roll bar setup. As you know an anti-roll bar is a very useful component to dial in a car’s handling by controlling the understeer/oversteer characteristics apart from reducing body roll. Mike Kojima’s excellent article on dialing in the ride and handling for a Sentra which has a similar setup) is a useful reference. Uncle Sam people like to call the anti-roll bar an "anti-sway bar" while most manufacturers typically call anti-roll bars "stabilizer" bars in their brochures. They are all the same.
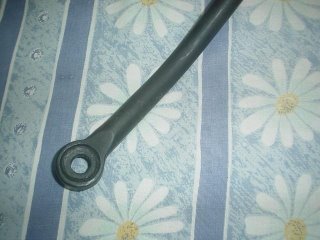
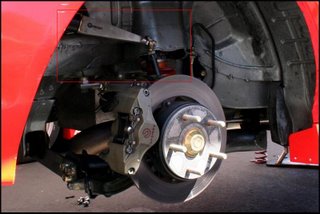
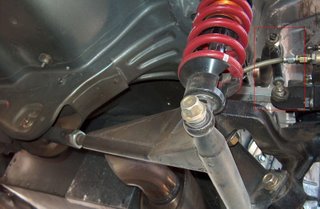
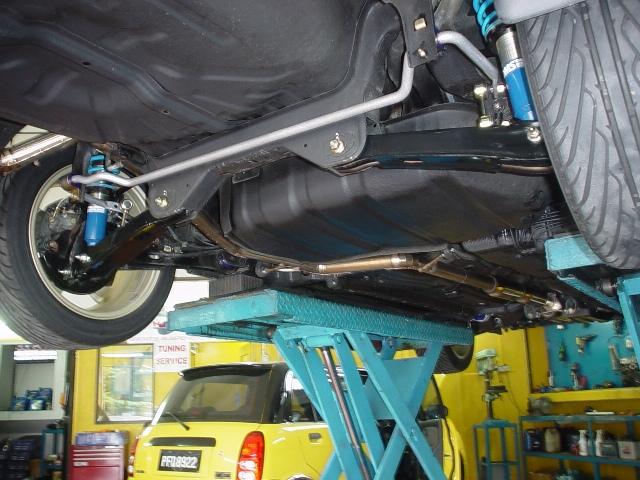
For some apparent reason the 99 year and post-spec Putra runs an 18mm diameter front arb setup with a 13mm rear. Not sure why Proton reverted to this setup as ealier pre-99 spec Putras were running a 23mm front arb. Maybe to ensure the Putra handles inferior compared to the GTi? ;) The Wira/Satria 1.6 and 1.8 runs a similar (23mm front) setup. Compare this to a DC2 Integra Type R for example with 24mm front and 22mm rear 96 year spec setup and 25mm front/23mm rear for 98 year and onward models. BTW the Wira/Satria 1.3 & 1.5 runs a front 18mm arb with no rear arb. You get the picture? Arrrggh! The anti-roll bars use a horizontal blade attachment point and the arb links are merely vertical rods with 2 pieces of rubber to act as the arb bush with the arb sandwich in between. This is the same for the front and rear. Pix of the front arb attachment point below.
The front arb is attached to the front lower arm and the rears also to the rear lower arm. GTI in comparison use a "direct acting" front setup with the arb itself directly connected to the front strut via a ball joint type arb link. The arbs have vertical end blades. The rears also use a similar setup but with the same mounting points as the Putra. The ball joint link is far superior to rubber bushes as unwarranted flex is eliminated. It is however far more expensive than rubber. A set of GTi arb links will cost you RM300+. Per end of car! The end links cost more than the arb itself! If you must know the GTI runs an 18mm front setup and 13mm rear too but the front direct acting setup and the use of much better quality arb end links means the arbs give a much better effect equivalent to going to a bigger diameter bar.
When I upgraded the SP’s arbs I was looking to reduce some roll inherent with the DMS 50mm setup as the double progressive springs are wound pretty soft at the beginning compared to a linear spring setup. I decided to "upgrade" the front arbs back to 23mm stock Proton/Mitsu arb instead of going the GTi route. The Proton/Mitsu part number for this arb is MB844453 and the arb is pretty cheap @ around 200 smackers. Reason is if you go to a larger diameter (>18mm) GTI front arb setup there is a tendency for the arb mount flange on the strut to fail. I am not sure if this problem is only inherent with the DMS shock’s flange but the fact that Mitsu reverted back to the front arbs being linked to the lower arm for the EVO4-9 tells the story. One of my Brudder’s actually cracked that flange twice on the track and had to send the shocks back to DMS for additional welding and reinforcement. Not a nice experience. I also upgraded the "D" bushes (Part No: SPF1572-23K) and the arb end link bushes (Part No: SPF2092BKP) to Superpro polyurethane (PU) items. PU is stiffer than rubber and has way less flex. For those of you in the know, Whiteline already supply Superpro oem PU "D" bushes which come free along with the arb itselft so why am I buying them separately? Pix below shows why.
No offence but no way I'm going to put yellow arb "D" bushes along with my silver arb. They look more like sorbet or egg tart. Got rice? At least the Superpro ones are dark purple blue. If anyone's interested these VERY YELLOW 18mm rear arb PU "D" bushes are yours for RM25. Buzz me. If you must Whiteline sells a stiffer front arb too but at only 24mm diameter I personally feel this is not a big enough upgrade in stiffness ratio for the price you are paying. The part number for this arb is BPF14. Pls ensure you change the "D" bushes to one that allows a 24mm arb.
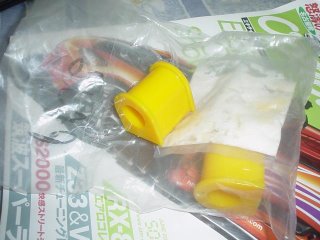
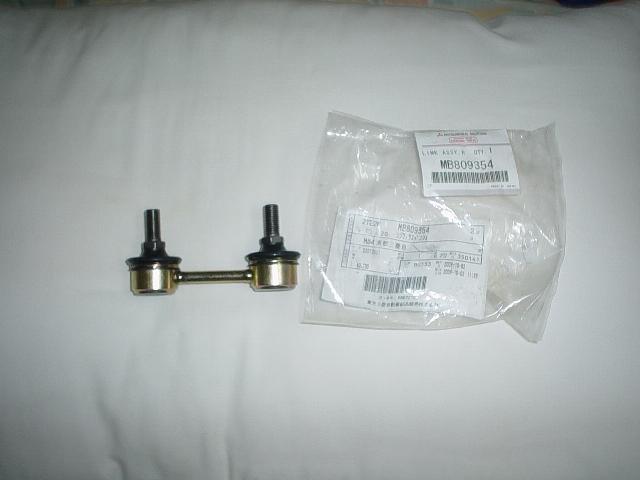
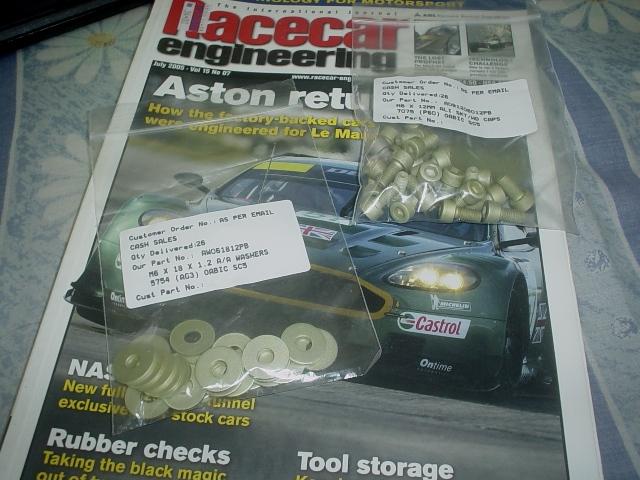
For the rears I decided on the trick GTI ball joint setup. This means that I will have change and upgrade not only the arb but the end link itself. Now this is going to sound most interesting to those who think the GTI is Lotus Tuned Handling. The part numbers for both Mitsubishi Mirage/Lancer EVO1-3 rear arb end links are the same. Still unconvinced I purchased the links from Proton and a similar link from Mitsubishi Japan to compare. Picture below of the EVO3 rear arb end link and packaging with part number. Make your judgement.

Worse of all PESC is charging bout RM320+ or so retail for a set of these end links whereas I can get a similar set of brand new end links air freighted from Mitsu Japan for less than RM290. And guess what! The same also applies to the fronts! Also purchased new nuts and washers from Mitsu Japan for this project. I decided to go to an adjustable rear arb from Whiteline. Part Number: BPR16Z. An adjustable arb means there are more than one mount holes on the arb end blades for you to adjust the stiffness ratio of the bar by connecting the end links via these holes. The "closer" hole mount point will give a stiffer ratio vs a "further" mount point. The Whiteline adjustable arb has 2 holes. I have seen some setups with 3 holes. And yes, Whiteline sells both adjustable and non-adjutable front and rear arbs for our cars with different diameters. You can look at them all here in Whiteline’s comprehensive on-line catalog
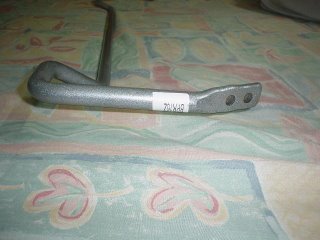
The newer Whiteline arbs have a silver powder coating and look way better aesthetically compared to the Smurf Blue older versions. Quality is pretty decent but I was pretty unhappy bout the end blades. They look uneven compared to say something from Cusco. Pix of my arb below.
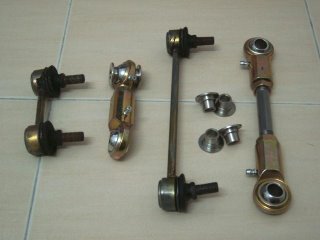
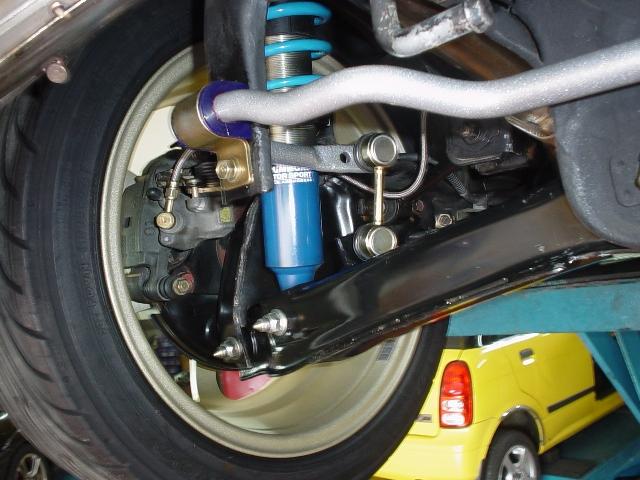
Also upgraded the rear "D" bushes (Part No: SPF1826-18K). Pix of the installed setup below. You can clearly see the new GTi/EVO2-3 spec end links and how the arb is connected to the end links. Also in the pix is the purple bling coloured Superpro arb "D" bush. At least it's not yellow. Can hear Coldplay singing that darn song in the background. Urrrgh!

Another pix of the new setup. The project was done way back when I was still using Yokohama AVS ES-100 tyres. Pardon the confusion.

With these upgrades installed, understeer is greatly minimized and you can rotate the Putra during corners far easier than the stock setup. Overall a very worthwhile but expensive upgrade. The whole project cost me in excess of RM1.5K with the Whiteline arb being the biggest hit at 750+ smackers or so a piece. If you think this is not hardcore enough Jacko Whacko is currently on a project using spherical bearing end links. These bearings were actually being passed around for licking during his wedding dinner! Lotsa customized machining being done to fabricate the bearing mount shafts. Sneak pixs of the project below. Just look at these end links compared to the stock GTI links. Farkin Huge! No limits to the Madness!
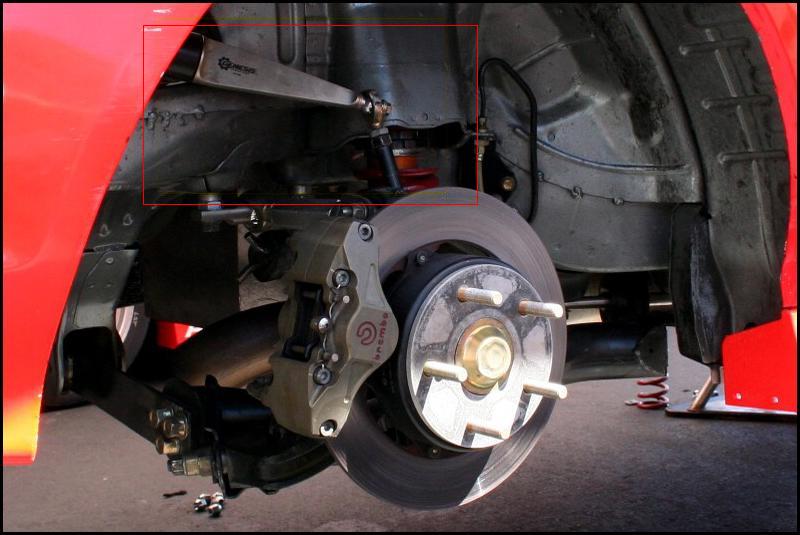
The longer link is the front btw. Pix below of the rear arb setup on a Realtime Acura RSX aka Honda Integra DC5 touring car participating in the US World Challenge Series. The arb blade and end link is shown in the red bordered box.
The arb is in the boot itself and is an adjustable hollow tubed assembly. Still the arb rate is unbelievably stiff. If engineered correctly a hollow tubed arb can be made lighter while maintaning the same stiffness as thinner solid tubed arb. Also noticed that there are no bends on the arb as there is no need to clear chassis and suspension arms in this setup. Not sure of the material used for the arb but on World Rally Car's it's titanium.
Another pix of the rear arb link and the funky looking rear suspension arms. The next time a manufacturer proudly boasts their Civic, Integra, Impreza, Evo or even the Hyundai Accent RXS is nearly the same as the works car being raced/rallied in top level competition you will know better!
Will talk about my rear suspension arms and links next. And also a feature on Superpro suspension arm bushes. Stay tuned.
For some apparent reason the 99 year and post-spec Putra runs an 18mm diameter front arb setup with a 13mm rear. Not sure why Proton reverted to this setup as ealier pre-99 spec Putras were running a 23mm front arb. Maybe to ensure the Putra handles inferior compared to the GTi? ;) The Wira/Satria 1.6 and 1.8 runs a similar (23mm front) setup. Compare this to a DC2 Integra Type R for example with 24mm front and 22mm rear 96 year spec setup and 25mm front/23mm rear for 98 year and onward models. BTW the Wira/Satria 1.3 & 1.5 runs a front 18mm arb with no rear arb. You get the picture? Arrrggh! The anti-roll bars use a horizontal blade attachment point and the arb links are merely vertical rods with 2 pieces of rubber to act as the arb bush with the arb sandwich in between. This is the same for the front and rear. Pix of the front arb attachment point below.

The front arb is attached to the front lower arm and the rears also to the rear lower arm. GTI in comparison use a "direct acting" front setup with the arb itself directly connected to the front strut via a ball joint type arb link. The arbs have vertical end blades. The rears also use a similar setup but with the same mounting points as the Putra. The ball joint link is far superior to rubber bushes as unwarranted flex is eliminated. It is however far more expensive than rubber. A set of GTi arb links will cost you RM300+. Per end of car! The end links cost more than the arb itself! If you must know the GTI runs an 18mm front setup and 13mm rear too but the front direct acting setup and the use of much better quality arb end links means the arbs give a much better effect equivalent to going to a bigger diameter bar.
When I upgraded the SP’s arbs I was looking to reduce some roll inherent with the DMS 50mm setup as the double progressive springs are wound pretty soft at the beginning compared to a linear spring setup. I decided to "upgrade" the front arbs back to 23mm stock Proton/Mitsu arb instead of going the GTi route. The Proton/Mitsu part number for this arb is MB844453 and the arb is pretty cheap @ around 200 smackers. Reason is if you go to a larger diameter (>18mm) GTI front arb setup there is a tendency for the arb mount flange on the strut to fail. I am not sure if this problem is only inherent with the DMS shock’s flange but the fact that Mitsu reverted back to the front arbs being linked to the lower arm for the EVO4-9 tells the story. One of my Brudder’s actually cracked that flange twice on the track and had to send the shocks back to DMS for additional welding and reinforcement. Not a nice experience. I also upgraded the "D" bushes (Part No: SPF1572-23K) and the arb end link bushes (Part No: SPF2092BKP) to Superpro polyurethane (PU) items. PU is stiffer than rubber and has way less flex. For those of you in the know, Whiteline already supply Superpro oem PU "D" bushes which come free along with the arb itselft so why am I buying them separately? Pix below shows why.

No offence but no way I'm going to put yellow arb "D" bushes along with my silver arb. They look more like sorbet or egg tart. Got rice? At least the Superpro ones are dark purple blue. If anyone's interested these VERY YELLOW 18mm rear arb PU "D" bushes are yours for RM25. Buzz me. If you must Whiteline sells a stiffer front arb too but at only 24mm diameter I personally feel this is not a big enough upgrade in stiffness ratio for the price you are paying. The part number for this arb is BPF14. Pls ensure you change the "D" bushes to one that allows a 24mm arb.
For the rears I decided on the trick GTI ball joint setup. This means that I will have change and upgrade not only the arb but the end link itself. Now this is going to sound most interesting to those who think the GTI is Lotus Tuned Handling. The part numbers for both Mitsubishi Mirage/Lancer EVO1-3 rear arb end links are the same. Still unconvinced I purchased the links from Proton and a similar link from Mitsubishi Japan to compare. Picture below of the EVO3 rear arb end link and packaging with part number. Make your judgement.
Worse of all PESC is charging bout RM320+ or so retail for a set of these end links whereas I can get a similar set of brand new end links air freighted from Mitsu Japan for less than RM290. And guess what! The same also applies to the fronts! Also purchased new nuts and washers from Mitsu Japan for this project. I decided to go to an adjustable rear arb from Whiteline. Part Number: BPR16Z. An adjustable arb means there are more than one mount holes on the arb end blades for you to adjust the stiffness ratio of the bar by connecting the end links via these holes. The "closer" hole mount point will give a stiffer ratio vs a "further" mount point. The Whiteline adjustable arb has 2 holes. I have seen some setups with 3 holes. And yes, Whiteline sells both adjustable and non-adjutable front and rear arbs for our cars with different diameters. You can look at them all here in Whiteline’s comprehensive on-line catalog
The newer Whiteline arbs have a silver powder coating and look way better aesthetically compared to the Smurf Blue older versions. Quality is pretty decent but I was pretty unhappy bout the end blades. They look uneven compared to say something from Cusco. Pix of my arb below.

Also upgraded the rear "D" bushes (Part No: SPF1826-18K). Pix of the installed setup below. You can clearly see the new GTi/EVO2-3 spec end links and how the arb is connected to the end links. Also in the pix is the purple bling coloured Superpro arb "D" bush. At least it's not yellow. Can hear Coldplay singing that darn song in the background. Urrrgh!
Another pix of the new setup. The project was done way back when I was still using Yokohama AVS ES-100 tyres. Pardon the confusion.
With these upgrades installed, understeer is greatly minimized and you can rotate the Putra during corners far easier than the stock setup. Overall a very worthwhile but expensive upgrade. The whole project cost me in excess of RM1.5K with the Whiteline arb being the biggest hit at 750+ smackers or so a piece. If you think this is not hardcore enough Jacko Whacko is currently on a project using spherical bearing end links. These bearings were actually being passed around for licking during his wedding dinner! Lotsa customized machining being done to fabricate the bearing mount shafts. Sneak pixs of the project below. Just look at these end links compared to the stock GTI links. Farkin Huge! No limits to the Madness!

The longer link is the front btw. Pix below of the rear arb setup on a Realtime Acura RSX aka Honda Integra DC5 touring car participating in the US World Challenge Series. The arb blade and end link is shown in the red bordered box.
The arb is in the boot itself and is an adjustable hollow tubed assembly. Still the arb rate is unbelievably stiff. If engineered correctly a hollow tubed arb can be made lighter while maintaning the same stiffness as thinner solid tubed arb. Also noticed that there are no bends on the arb as there is no need to clear chassis and suspension arms in this setup. Not sure of the material used for the arb but on World Rally Car's it's titanium.
Another pix of the rear arb link and the funky looking rear suspension arms. The next time a manufacturer proudly boasts their Civic, Integra, Impreza, Evo or even the Hyundai Accent RXS is nearly the same as the works car being raced/rallied in top level competition you will know better!

Will talk about my rear suspension arms and links next. And also a feature on Superpro suspension arm bushes. Stay tuned.
Wednesday, June 21, 2006
Behaviour
Apparently some members of a certain car group which I shall not say here think some of my responses in their forum in comparison or reference with what I've done to the SP to be boastful and offensive. My response to this is "Too Bad and I'm Outta Here!". I speak from experience so if you think this is offensive then my apologies but I'm not going to change my very direct style and way for your sake. This has been a good key learning so in future I'll be very very careful with the advice or response that I dish out especially in car group forums. Better to blabber around in my own blog..
Monday, June 19, 2006
Porn Mags
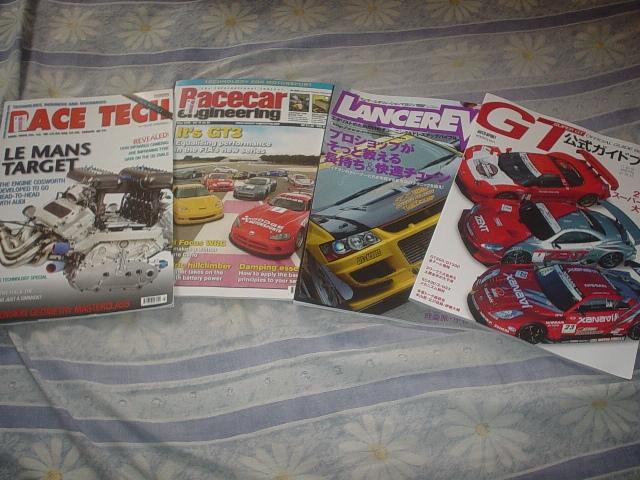
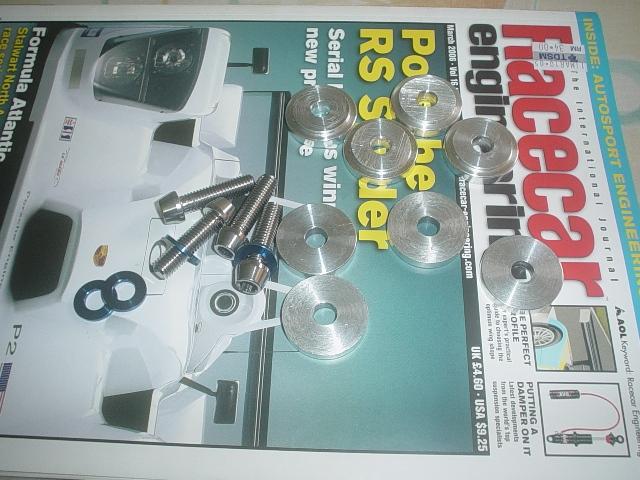
Was in KL last weekend when I decided to drop by my favourite Japanese bookstore Kinokuniya located in Isetan KLCC. Have not been to Kino in close to a year so this was going to be a big one. 1 hour later and RM130+ poorer, I came out with a happy smile and 2 Jap "porn" mags. The latest Lancer Evo magazine - volume 27 and also the Autosport 2006 Super GT Official Guidebook. Pix of mags below including 2 mags which every hardcore modder and engineer should not do without. If you want to know about technology on race cars (not show cars) and the racing industry, beg, borrow or steal your regular supply of Racecar Engineering and Racetech. There are practically zero pictures of scantilly clad women in these mags so for those who like this sort of stuff, get Super Street. And these mags are in Engrish as they're from the UK! Both mags are published monthly.

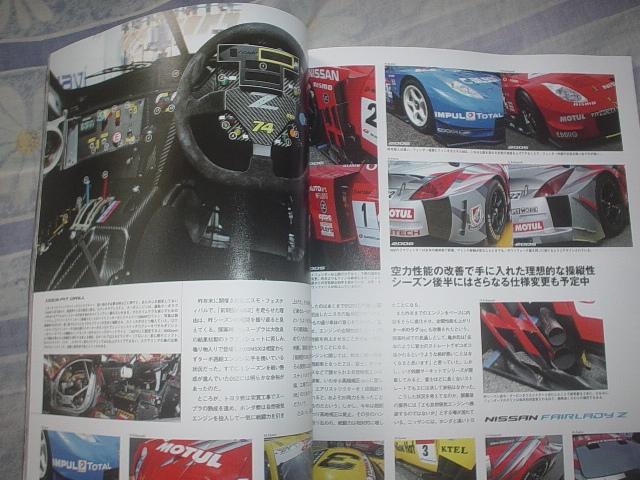
Nissan 350Z GT Racecar featured in the Autosport 2006 Super GT Official Guidebook. There are detailed tech reports of all the 3 GT500 class works cars (Toyota, Nissan and Honda) including comparison of aero changes done from 2005 to 2006 models.

2 more mags which I consider essential if you own a Japanese car or a Jap car wannabee like earlier Protons would be the Option and Option 2 mags. These are essential mags which showcase the Jap mod industry and latest "trends" in JDM car mod world. Pix of mags below. Both Option and Option 2 are published monthly and are available in any language so long as it's Japanese.

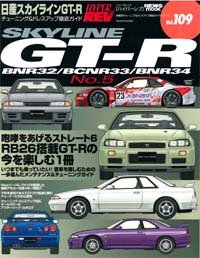
Another Japanese language mag which is considered a bible is the Hyper Rev series. Each volume caters to a specific generation of model and most popular performance cars such as Lancer Evo, Subaru Impreza, Nissan Skyline, Sylvia, Toyota Supra, etc. etc. are covered. The mag will detail the car and also there's coverage on show cars from popular Jap speedshops. In addition the mag will also detail all the performance and show parts available for the particular car being covered. Really essential reference material if you want to mod your popular Jap car. Pix below of the volumes of the mag.
Again it's solely in Japanese. Speaking of which I have one copy of a volume I don't need. Subaru Impreza must have sounded a wee bit too much like Subaru Legacy in Japlish and one of my Jap Bros got me the wrong mag when he went home to Japan recently. I now have a Hyper Rev mag on the Subaru Legacy which I do not need. Any takers? The mag is in mint condition. Pix below. Give me an offer!

I have the majority of the cars which I favour including Evos, Imprezas, Integras, Civics and even the Levin/Trueno. Call me if you're in Penang and need a quick reference. No stains on the mags pls.
There are many other great Jap mags out there and really it would take me too much time to cover them all. Mags such as the Lancer EVO series, Impreza Magazine, VTEC Sports, Club Skyline, etc. all cover the latest and greatest of a particular Jap performance car. They are mostly from the same publisher in Japan called News Publishing. You can order direct if you're too lazy to go to Kinokuniya but you will need a fax. The web page has an Engrish order form which you'll have to print out, fill in what mags you would like to order and then fax to them. They don't entertain e-mail unfortunately. Happy Reading and Learning Jap!
Nissan 350Z GT Racecar featured in the Autosport 2006 Super GT Official Guidebook. There are detailed tech reports of all the 3 GT500 class works cars (Toyota, Nissan and Honda) including comparison of aero changes done from 2005 to 2006 models.
2 more mags which I consider essential if you own a Japanese car or a Jap car wannabee like earlier Protons would be the Option and Option 2 mags. These are essential mags which showcase the Jap mod industry and latest "trends" in JDM car mod world. Pix of mags below. Both Option and Option 2 are published monthly and are available in any language so long as it's Japanese.

Another Japanese language mag which is considered a bible is the Hyper Rev series. Each volume caters to a specific generation of model and most popular performance cars such as Lancer Evo, Subaru Impreza, Nissan Skyline, Sylvia, Toyota Supra, etc. etc. are covered. The mag will detail the car and also there's coverage on show cars from popular Jap speedshops. In addition the mag will also detail all the performance and show parts available for the particular car being covered. Really essential reference material if you want to mod your popular Jap car. Pix below of the volumes of the mag.

Again it's solely in Japanese. Speaking of which I have one copy of a volume I don't need. Subaru Impreza must have sounded a wee bit too much like Subaru Legacy in Japlish and one of my Jap Bros got me the wrong mag when he went home to Japan recently. I now have a Hyper Rev mag on the Subaru Legacy which I do not need. Any takers? The mag is in mint condition. Pix below. Give me an offer!

I have the majority of the cars which I favour including Evos, Imprezas, Integras, Civics and even the Levin/Trueno. Call me if you're in Penang and need a quick reference. No stains on the mags pls.
There are many other great Jap mags out there and really it would take me too much time to cover them all. Mags such as the Lancer EVO series, Impreza Magazine, VTEC Sports, Club Skyline, etc. all cover the latest and greatest of a particular Jap performance car. They are mostly from the same publisher in Japan called News Publishing. You can order direct if you're too lazy to go to Kinokuniya but you will need a fax. The web page has an Engrish order form which you'll have to print out, fill in what mags you would like to order and then fax to them. They don't entertain e-mail unfortunately. Happy Reading and Learning Jap!
Monday, June 12, 2006
My New Daily Ride - Nissan Sentra 1.6 SG Manual
Finally got my car on Thursday June 1st. In case you guys wanna know I finally bit the bullet and booked a 1.6 manual Sentra with full Nismo bodykit. Looks fierce and is the only non-national sedan car still available with a manual gearbox option.
Took more than 4 friggin weeks for my car to be delivered. Must be record wait time for a Sentra. Apparently this is due to not many people wanting the manual version. Sigh! Apparently out of every 10+ Sentras sold, only 1 is a manual. What a crying shame. Sad country we live in. Also splurged 150 smackers to get the switch to fold in the side mirrors. Every new Sentra sold in this country comes with the side mirrors already fitted with the folding motor but only the 1.6 SG-L (luxury) and 1.8 XG-L models have the switch to activate the folding fuction. Picture below shows the stock switch console without the folding rocker switch . As you can see the bottom half of the switch console is blanked off. Part number listed on the packaging is for the switch with the folding option. Sorry for the confusion. And NO the Sentra does not come with 17" OZ Supertourismo wheels despite what the crappy brochure shows. One of these days TC is gonna get in trouble. You get micro 14 inchers on the SG and only the SG-L and XG-L come with acceptable 15 inchers.

Upon delivery found that the one side of the instrument panel was properly lit and the other side/half only dimly lit. Suspected blown bulb or connection problem. Oh ya.. and they forgot to connect back my speedo & odo cable so both were not functioning. Called SA and arranged with him to visit TCEAS on Friday. Had to take leave. Bummer!
Arrived @ TCEAS Patani Road Friday 10+ am. Was promptly told by the Service Manager to come back next week as they’re fully booked for the day. WTF! So much for great service. My SA calls his Manager who promptly takes the car to TCEAS in Bayan Lepas (near airport next to Chevie Service Centre). In the meantime my SA shows me where to plug back the speedo connector on the engine block. With my speedo fixed I drove the car back to the showroom where the Manager took my car to be fixed. Got it back to around 4pm in the late afternoon. Proceed to go get some nice rubber matts. Settled for black 3A variant similar to what my wifey is using on her Optra.
Saturday was pretty exciting. Spend morning waxing/cleaning da car. Took it to Sg Bakap and back (fetchin wifey to watch movie). Tyre roar from the Goodyear Ducaro GA was pretty atrocious but otherwise no other complain. Smooth, quiet and refined as any other Jap sedan. Pretty stable at 120km/h. Quite a lot of wind noise though but the same can be said for the Focus which I test drove. Heard the Civic’s really quiet though. Steering feels a way bit too light for me. Guess most of the newer cars (Focus exempted) feels that way. Brakes are pretty decent despite rear drums. For road use can’t imagine why anyone would still want the Brake Booster Assist option. Nuts! Manual shifter feel is pretty precise and has a nice feel than stock Wiras/Satrias. Since it’s directly connected to the gearbox (unlike cables for the Wira) you don’t wanna place your hand continuously on it for long periods as it vibrates and tingles.
Spend Sunday doing research on replacement tyres as I'm pretty irritated with the tyre roar. These are not semi-slicks dammit! Wifey comes to Penang in her Optra so I get to drive both cars back to back for comparo. As expected the Optra has way better ride and handling but the Sentra’s more comfy and cushy soft. With a manual gearbox, Sentra’s also way more powerful and responsive too. At this point I decided on either the Michelin Energy XM1s or the Yokohama Aspec DBs.
On Monday went to see my regular tyre shop and was promptly offered 15” new Nissan Sentra SG-L/XG-L rims with the XM1s. After trade in my stockies have to only top up around 900 smackers. Offer too good to refuse. Sorry Yokohama. With the 15 X 6"” wheels fitted the car does look way better aesthetically. The 14 X 5.5” was too narrow and looked like it was hidden behind the bodywork. Too much offset. BTW.. Sentra is using 40 offset and 114.3 4 lug PCD. Oh ya.. and 4-5 of my stock lugnuts had signs of rust on them. WTF again. Gonna complain and get the lugnuts replaced during my 1000km service. The XM1s are really comfy but at the expense of a softer sidewall. Can feel more bodyroll. Might try the Pilot Preceda PP2s later. Overall I’m pretty satisfied with the car. Especially the refinement, build quality and comfort. And how does it compare to the SP? No comment!!! Pixs of car to follow..
Tuesday, May 30, 2006
Killing 2 Birds with 1 Stone
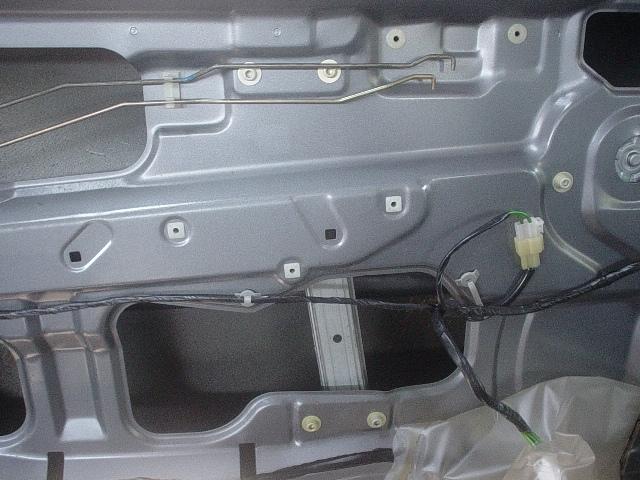
The power window switch on the SP's passenger side decided to go into semi retirement after 6+ years of faithful service. The switch could still bring down the side window but couldn't bring it back up. Bummer! While replacing the switch I decided to remove the inner door cover and replace all the mild steel bolts with lightweight aluminium potassium bichromate coated items. Also did the driver door side. There are 8 M6 X 12mm bolts per door on the inner side and 16 bolts total for 2 doors. Picture below of the new lightweight bolts. Using the larger than standard 18mm diameter washers.

Picture below of the new bolts on the passenger side door

Picture of the faulty switch. Switch cost me RM48. Bolts cost me.. errrm....

Picture below of the new bolts on the passenger side door
Picture of the faulty switch. Switch cost me RM48. Bolts cost me.. errrm....

Friday, May 26, 2006
TMM Archives - Ralliart Group N Long Hub Bolts/Lugs
If you're planning to run thick wheel spacers (>10mm) to clear your 4/6/8 pot race calipers then the stock hub bolts/lugs will not have sufficient thread left for the lug nut to securely fasten the wheel when the wheel is mounted. The stock hub bolts/lugs are only 45mm in length. My Japanese supplier was able to supply me slightly longer 55mm length bolts but I decided to go for the pukka Ralliart WRC Long Hub Bolts (Part Number: RX031877A1) as these are 66mm in length and made of much stronger tensile grade steel than the stock bolts/lugs. You will need to increase the strength of the material to make up as you're already loosing stiffness and strength going to a longer bolt. Believe I have seen lugs break when too much muscle power is made to loosen an overtighten lug nut. Not a nice sight and a real pain to fix. The bolts are also zinc plate to prevent corrosion and ultimately rust. Picture below of the bolts pressed mounted to my front hub/axle assemble.

Picture below of the entire assy with my CNC machined 12mm wheel spacer mounted. As you can see lots of thread and length of hub bolt/lug left for the wheel and lug nut.

These long lugs just perfectly reach near the end of the thread of my Racing Gear lugnuts with the wheel mounted.

Price of the Ralliart long hub bolts unfortunately is not so friendly. It cost a whopping near RM500 for 8 bolts/lugs. No shit!
Wednesday, May 24, 2006
Carbon Side "GT" Mirrors
The stock powered side/wing mirrors weight 1.1kg per side (2.2kg total). These are less than 200 grammes for complete assembly including mounting plate. Great way to lose some high up weight. Also the size and shape of the mirrors results in less drag compared to the stock mirrors. Spoon Sports, Signal Auto, SPA Design and numerous other go-fast companies make similiar mirrors. Picture below of carbon GT side mirror including it's mounting plate. The mount leg is anodized aluminium while the ball pivot is stainless steel and threaded for easy adjustment. Mirrors used are convex so appear objects in mirror will appear larger than normal. Helps to compensate for the smaller sized mirror. I have no visibility issues using these side mirrors.

Picture below of the mirror mounted to the SP. All in all a pretty decent mod. Looks trick, lessens weight and also reduces aero drag too. Also took the opportunity to remove the mirror adjustment controller from the dash and replace it with a carbon blocking plate. Not recommended for those who have a mirror adjustment fetish. Fasteners used are stainless steel. Will lose even more weight going to titanium & aluminium.

One note of caution though. You'll want to be careful parking your car anywhere with these mirrors are they're pretty easy to be ripped off and stolen.
Here's a recent pix of the SP with these mirrors waiting to be chassis foamed. Will do an article on that later..

Friday, May 12, 2006
The Development Never Stops - Preview of Jack's Fuel Line Conversion
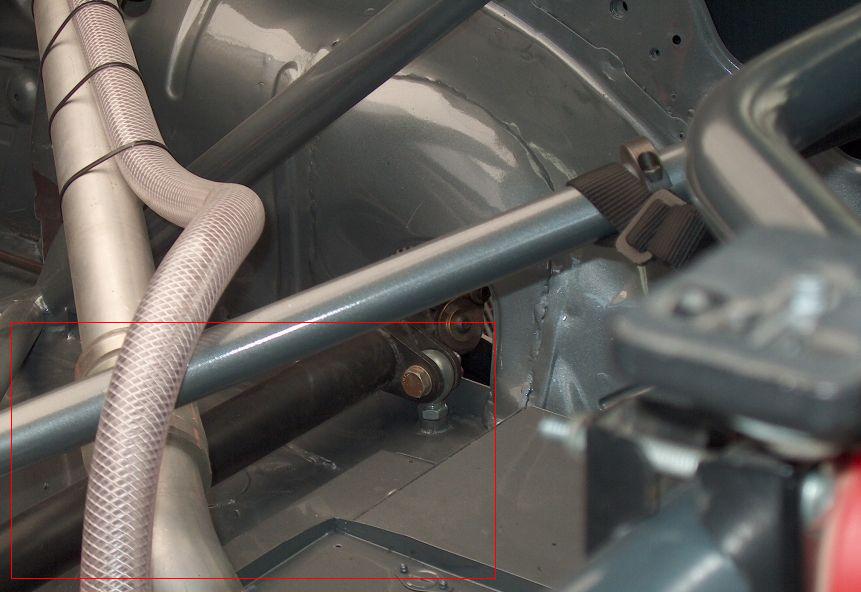
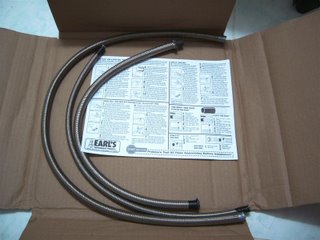
While I've been busy lately with non-SP related matters (such as getting my daily banger) my mates have been at the mod stuff even harder. Picture below of Jack's latest project. He converted not only the fuel rail supply line to AN fittings with braided hoses but the fuel pressure regulator and fuel return lines as well. This guy never ceases to amaze me. Enjoy the art work below. You can just imagine the planning, lengths and types of braided hoses, alloy AN hose ends and not forgetting the $$$$$ involved. Just the fuel rail supply line + adapter alone will cost RM400+ You can more than double it with the fpr end. And that doesn't include buying the fpr itself. I think you can get the basic Sard fpr for below RM400 if you try hard enough. Jack's using Earl's hoses and end fittings while I'm using Goodridge. The different brands are not interchangeable except for the adapters. Anyone out there wanna try Aeroquip, XRP or Icore?
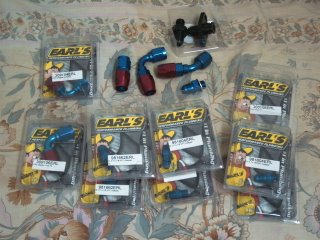

Hopefully Wacko Jacko will do a full article when he's up to it. The gaffer's getting married next month. Happy Getting Married Bro!!!! Watch this space.
The other nutcase is Senior. He's been hard at work most of his off days stripping the tar and sound deadening from his monster. With his own hands! Senior's also got himself a Motordrive race seat. Jacko and Senior should be called the IMF - Impossible Modding Force! Think I better go dig a hole somewhere for myself to hide. As it is and at the rate things are going lately I might have to take a sabbatical from modding. Planning to get hitched early next year and will also be moving into a new love nest - SP, new car and all. Might work on small projects when funds and time become avail. My shifter base bush kit for one is still sitting in my room gathering dust. Will see how things go..
Sunday, April 30, 2006
Symborski Transmission Shifter Base Kit
These are ready to go in when I can find some time off work to get on with my life. It's been hell the pass two weeks with up to 15-16 work hours per day. The Symborski transmission shifter base bushes are made from aluminium and will help to eliminate the sloppy movement of the shifter base plate resulting in much more defined shift pattern. The stock rubber bushes are designed with NVH elimination as the primary focus and little else. According to Jack they're lighter than the stock rubber bushes too believe it or not.
My friggin titanium fasteners took more than 4 weeks to arrive. Also, notice that the bolts are natural colour while the washers are anodized blue. Everything was supposed to be blue. Miscomunication from my part due to work stress. Aarrrrgh!. Nevermind. Once everything is installed you won't be able to see s**t. The clear coloured titanium bolt with blue anodized washer also turns out looking pretty cool imho. Full installation report to follow. Oh.. these fasteners cost nearly double the cost of the Symborski transmission shifter base bushes. The kit (without the Ti fasteners is RM120) if you're interested. E-mail me.
It's a Blue World! Cusco "Pillowball" Suspension Top Mounts
If you're using uprated shocks and want more improvement in steering and suspension feel and damping, the next step to go would be to replace the stock rubber mounts on top of your front and rear shocks with spherical bearinged versions. The spherical bearing eliminates unwanted rubber flex which can hinder the shocks damping. The 101 in Suspension Theory states that the shock absorber should be the only component doing the damping. This is however not the case for road cars. Rubber bushes reduce NVH and maximum ride comfort but they also flex and introduce unwarranted uncontrollable damping movement of their own. The Japs like to call spherical bearings "pillowball mounts" hence the term.
I emailed DMS on which was the most suitable top mount for my 50mm shock and was surprised to hear Cusco. In fact Cusco even used to oem for DMS Japan. Since then DMS has manufactured their own specific and improved version of the top mount but last I heard these are only available for the newer Evos and Imprezas. Picture below of the new DMS Top Mount. Picture below of the new DMS top mount for Evo7-9

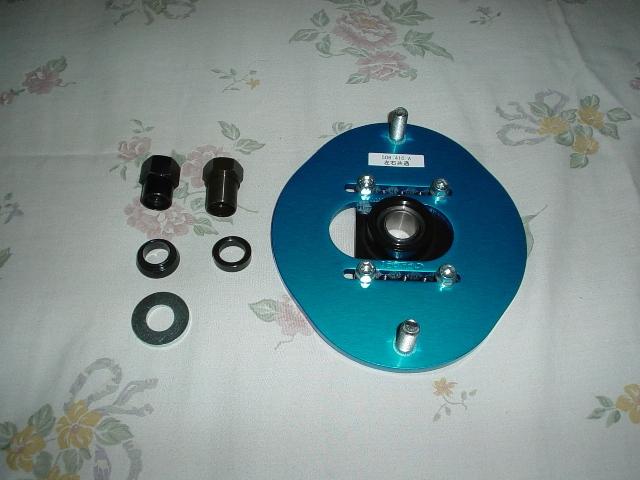
Anyway, back to my Cuscos. I decided to replace both my front and rear top mounts at one go. Also had to order the DMS fitting kit (top nut and metal adapter) to enable to Cusco to clear the larger diameter DMS 50mm shaft. Price per mount is about RM750 so to replace both the front and rear sets would set you back RM1.5K. For those on a budget I would recommend only replacing the fronts as these are designed to allow you to adjust the camber easily. The rears are fixed. Picture below of the front Cusco pillowball mount (Part Number 508 410A). The nut with the shorter shaft (left most) is the DMS fitting kit.

Picture below showing the bottom of the mount. The camber is adjusted via the bottom sliding steel black plate and pillow ball section. The top blue anodized plate is made from 60mm thick 2017S heat treated aluminium alloy.

Both top and bottom plates are held together via 4 M6 X 20mm bolts which Cusco supplied the el cheapo mild steel variety. Arrgh! Needless to say I dutifully replaced these with stainless steel versions.
The Cusco rear mounts are available in 3 types to incorporate different spring diameters used by different shocks. The rear mounts are availble to suit 60mm, 65mm and 70mm coil spring diameters. Yes, these can also be used for conventional non-coilover shocks. If in doubt check with your shock manufacturer. Picture below of rear mount, part number 508 421S for 70mm spring which was advised by DMS to be used for my shock. The part number for 60mm spring is 508 421 A60 and 65mm spring is 508 421 A65.

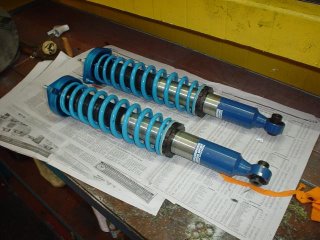
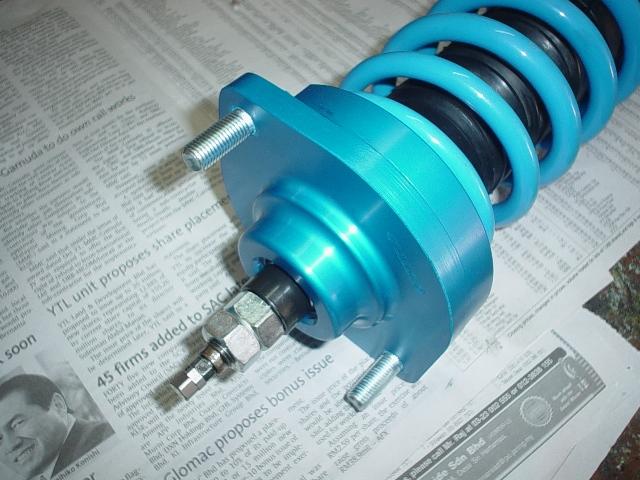
Installation took the most of the day and the shocks would have to be removed from the car. Closeup picture below of the Cusco top mount installed on my DMS 50mm front shock.

Closeup picture below of rear shock/damper with Cusco top mount.

Rear shocks ready to be installed back on the SP.
So how does the car perform with these mounts installed? One word.. "Excellent"!. Steering feel is much improve and so is the suspension damping. For those using rubber top mounts you can literally feel the mounts flexing under hard cornering load and this is totally eliminated with the Cuscos installed. The cons? Well if you want first class NVH then the Cusco mounts are not for you. You can really feel the road! Also, until the spherical bearing is fully broken in, you will get an alarming clunk from your springs when turning on an uneven surface. Takes a couple weeks to clear up but then honestly I couldn't be bothered. The SP's loud as it is already. Also the flex on the rubber bushes helps to reduce the load to your chasis suspension turrets. Going to stiffer mounts simply means all this load is now acting on your chassis shock mount turrets. Inspect them regularly for signs of fatigue or crack at the seams.
I emailed DMS on which was the most suitable top mount for my 50mm shock and was surprised to hear Cusco. In fact Cusco even used to oem for DMS Japan. Since then DMS has manufactured their own specific and improved version of the top mount but last I heard these are only available for the newer Evos and Imprezas. Picture below of the new DMS Top Mount. Picture below of the new DMS top mount for Evo7-9

Anyway, back to my Cuscos. I decided to replace both my front and rear top mounts at one go. Also had to order the DMS fitting kit (top nut and metal adapter) to enable to Cusco to clear the larger diameter DMS 50mm shaft. Price per mount is about RM750 so to replace both the front and rear sets would set you back RM1.5K. For those on a budget I would recommend only replacing the fronts as these are designed to allow you to adjust the camber easily. The rears are fixed. Picture below of the front Cusco pillowball mount (Part Number 508 410A). The nut with the shorter shaft (left most) is the DMS fitting kit.
Picture below showing the bottom of the mount. The camber is adjusted via the bottom sliding steel black plate and pillow ball section. The top blue anodized plate is made from 60mm thick 2017S heat treated aluminium alloy.
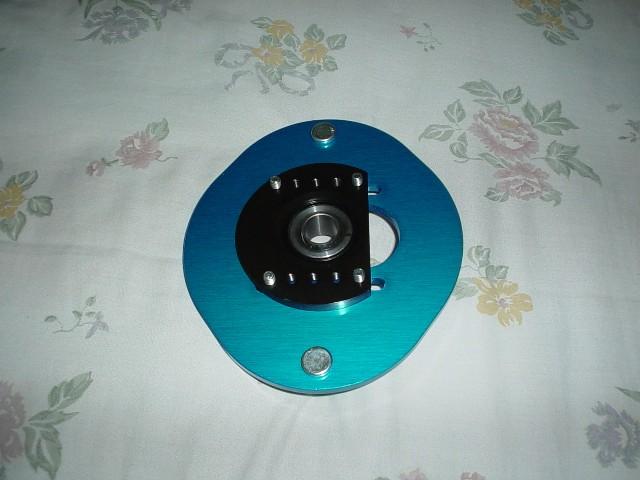
Both top and bottom plates are held together via 4 M6 X 20mm bolts which Cusco supplied the el cheapo mild steel variety. Arrgh! Needless to say I dutifully replaced these with stainless steel versions.
The Cusco rear mounts are available in 3 types to incorporate different spring diameters used by different shocks. The rear mounts are availble to suit 60mm, 65mm and 70mm coil spring diameters. Yes, these can also be used for conventional non-coilover shocks. If in doubt check with your shock manufacturer. Picture below of rear mount, part number 508 421S for 70mm spring which was advised by DMS to be used for my shock. The part number for 60mm spring is 508 421 A60 and 65mm spring is 508 421 A65.

Installation took the most of the day and the shocks would have to be removed from the car. Closeup picture below of the Cusco top mount installed on my DMS 50mm front shock.

Closeup picture below of rear shock/damper with Cusco top mount.
Rear shocks ready to be installed back on the SP.

So how does the car perform with these mounts installed? One word.. "Excellent"!. Steering feel is much improve and so is the suspension damping. For those using rubber top mounts you can literally feel the mounts flexing under hard cornering load and this is totally eliminated with the Cuscos installed. The cons? Well if you want first class NVH then the Cusco mounts are not for you. You can really feel the road! Also, until the spherical bearing is fully broken in, you will get an alarming clunk from your springs when turning on an uneven surface. Takes a couple weeks to clear up but then honestly I couldn't be bothered. The SP's loud as it is already. Also the flex on the rubber bushes helps to reduce the load to your chasis suspension turrets. Going to stiffer mounts simply means all this load is now acting on your chassis shock mount turrets. Inspect them regularly for signs of fatigue or crack at the seams.
Friday, April 28, 2006
Header Design, Fabrication and Terminology 101
Casey Heerman, Assistant Technical Director of Burns Stainless LLC (a popular American Exhaust Design Consultant and Parts Supplier) recently posted this article in the K20A.org forum. Excellent read..
Header Material- headers can be made from a variety of different materials. 304 ss 321 ss Mild Steel Titanium and Inconel 625
304 SS - Is your run of the mill material and will work for most NA applications the most common thickness is .065 wall or 16g, to save some weight you can go to 18g .049 or even 20g .035 for the experienced fabricator
321 ss - Is found on most turbocharged applications in a 16g .065 wall thickness. The use of 321 is advantageous as it will maintain it's strength properties at elevated temperatures. 321 is also good for use in 20g .035 Na headers where better strength properties are desirable.
Mild Steel - Is your standard run of the mill tubing very easy to fabricate with, and very inexpensive. It does rust and it will eventually decay into nothing as far as I'm aware from a headercentric stand point it offer no favorable properties over mild steel, except for the slightly lower coefficient of thermal expansion
Inconel 625 - IS the most wonderful material to use in a header but heck we don't all make what bill gates does. 625 has excellent strength properties, fatigue resistance, it doesn’t grow as much as stainless and it insulated better then stainless. It is essentially a Super stainless alloy. It's very expensive and can be used in wall thicknesses of .028 22g to fabricate NA headers, which can provide a great weight savings.
Titanium - I have heard mixed opinions on the use of Ti for header construction, some say it wont last some say it will regardless it's extremely hard to bend and even harder to find in the sizes needed so we won't delve into this too much. However if used it can offer a wonderful weight savings.
Head Flange - This is the base of the header normally offered in two different materials 304SS and Mild Steel. Both materials have good properties, the mild steel being quite a bit better for the beginner builder as it does not warp near as much when you weld it. When using a 304 SS flange it is going to warp quite a bit, it will require surfacing, a 20" face grinder is great for this. Flanges should be the same shape as the exhaust port and a certain amount larger to allow for the tubing to be fit to the port a rule of thumb is large enough to fit .065 tubes.
Primary tubes - These XX number of tubes will channel exhaust gas to the merge Collector. They should have both a length and a size measurement along with notation of steps.
Example: Primaries: 28" X 1.75 Od : This would indicate a primary length of 28" OAL starting at the face of the cylinder head and ending at the very end of the tube.
The primary tubes length and size is very important, for different length and sizes you can actually change the power curve pretty significantly if you have an engine that responds well to exhaust changes.
On a Tri-Y or 4-2-1 header they still have primary tubes, the primaries on a tri-y start at the face of the head and end at the end of the tube that enters the first set of collectors. Immediately after the primary tubes end the secondary tubes begin.
Secondary Tubes - These start Immediately after the primary tubes end, they Include a portion of the collector. This is another area of adjustability that can offer good header tuning. When the header is constructed properly you will be able to see a change in the engine by adjusting the size and length of the secondary's.
Merge Collectors - Merge Collectors are MOST COMMONLY REFFERED TO BE THERE INLET SIZE. The inlet size is the Od size of the tube that the collector must slip over. a 3" Collector to me means 3" primary tubes.
Parts of the collector
Inlet - As stated above, in our world this will 99% of the time be a slip fit. If your going to call the collector refer to it by this size
Collector Choke (minor diameter) - This is the size the can make or break a good header This doesn’t need to be 3" unless you have something super weird going on with your engine. I have not design a Honda header yet that even needs close to a 3" Collector choke. I’m not saying it wont or cant happen, I’m just very skeptical of it
Final Outlet - The final outlet can be configured a variety of ways. Most common for road going cars that need mufflers is a transition from the choke to the correct tailpipe size and a ring (ring is a straight section of tubing where you can slip fit weld a flange V-band etc.) . Another configuration that we often use and popularized if not Pioneered is the megaphone with reverse cone we have used this in many applications with great success and use it as often as possible. When using a large diameter final outlet like a 3" on a K series engine, if bogging is epxerienced at low rpm you need to consider retuning the engine, this not a fault of header, large exhaust or open exhaust
Header Configurations
4-1: a 4-1 Header is typically going to operate in a farily narrow rpm band of say 4000 RPM, people that ask a 4:1 to do more then this are asking way too much of the header. However the rpm range can be lengthened by the implemetion of a megaphone and reverse cone and will work well when sized correctly
4-2-1 or Tri-Y: A Tri-Y will typically operate in a very broad rPm range. When designed correctly they will dramatically increase the mid range without loss of peak HP
And here's a recent example of the excellent work done by Burns Stainless. Exhaust shown is a 4-1-2 long primary design for a K24 road race engine. Material used to fabricate the header is 321 stainless. One day I will have such an exhaust on the SP. Price of header? Don't ask..

Sunday, April 23, 2006
Daily Driver
It's time to get a daily beater as I'm getting old and want a comfy conventional car that I can cruise around. Slowly... The SP just hates going slow and pottling around in traffic is a pain due to the on-off effect of the lightweight flywheel and big cams. It's like trying to take your pet Lion for a walk in the park if you get the drift. Want a 4 door banger that handles reasonably well and doesn't look like it just came from a senior folk's home. Budget's 100K max as spending more means I won't have enough moolah to continue the development of the SP. Currently in my top 2 list are the Nissan Sentra 1.6 Manual (Hoorah!) and the Suzuki Swift. Suggestions, comments and opinions? Wifey's dead against me getting another Proton. Don't suggest the Chevie Optra as wifey already has one and also not the Vios as I talked her out of buying it to get the Optra instead. And no offence to Honda City owners but that car reminds me of something from the frog family possibly a tadpole..
Friday, April 14, 2006
Catpain

Picture above is what one of my local friendly stray cats did to my car cover. Because of the cat problem I've been having for the last couple years I've had to change car covers every 6 months or so. And because of the cat, the SP now has 2 car covers and lotsa rags on the bonnet to protect it. Not that I'm being paranoid but imagine what would happen if kitty dearest exercises it's claw sharpening on the carbon bonnet! This latest incident even holed the additional car cover below. Luckily the bonnet was unmarked. On top of this the cats like to fertilize the garden and backyard with their faeces and my poor parents and me have had to wash the compound and backyard nearly every other week.
I've tried everything from putting additional fencing (but these buggers climb better than Spiderman) to washing the compound with vinegar. (only worked for bout 2 weeks before our excellent rains washed off everything) to chasing them and spraying them with water but they keep coming back. This latest incident is fast approaching the last straw as far as I'm concerned. Apart from getting a shotgun and blowing these buggers to kitty heaven does someone have a better suggestion? Any volunteers to come catch the cats?
Monday, April 10, 2006
Evo Boot Bar
Since the Evo5, Mitsubishi has installed an additional bar in the boot in an effort to make the rear chassis stiffer. The bar installs via the 2 bolts holding the rear bumper support/reinforcement. Picture of said bar from a Mitsu Evo7 brochure.

While surfin the web and doing my research on car mods I came across several Jap Mirage and Lancer web sites highlighting this mod and what caught my eye was the fact that this means the same bar can also be fitted to the Wira, Putra and Satria. A couple emails to Ralliart and also a couple hundred bucks (about RM300) poorer the boot bar dutifully arrived at my door step. Weight of the bar is next to nothing as it is constructed fromp pressed aluminium plate. Installation was a no-brainer and DIY. All you need to do is to remove 2 bolts, place the bar over the bolt holes in the boot making sure the holes on the 2 corners of the bar are aligned with the bolt holes and re-fasten back the bolts. I also took the opportunity to replace the 2 bolts and washers with Ti items. Pictures below of bar installed on the SP.


The bar takes up very very minimal space in the boot so for those of you who like to use your boot as a mobile drawer or cabinet don't worry. The effect can be felt immediately with less squeaks emnating from the boot area especially when going over speed bumps that seem to be everywhere in our country.
Wednesday, April 05, 2006
TMM Archives - Carbon Radiator "Slam" Panel
A good way to prevent the airflow from spilling out of the gap between the radiator and the car's front subframe would be to fit a radiator slam panel. The slam panel blocks out the gap thus ensuring the airflow is only through the radiator improving cooling efficiency. Picture below of the radiator slam panel for the SP. Fits any Satria/Wira/Putra/GTI. If you're one of those that think raising the back of your bonnet with spacers looks cool then the slam panel will not clear the bonnet as my bro Senior found out much to his dismay. I choose not to cut a hole for the radiator although that can be done. Removing the radiator also removes a couple hundred grammes of useless weight.

Closeup of the bottom surface. Yes, it's 101% carbon. No CSM aka fibreglass.

Installed on the SP. Button head bolt on the slam panel is Titanium. The 4 bolts holding the top radiator brackets is PB 7075 aluminium.

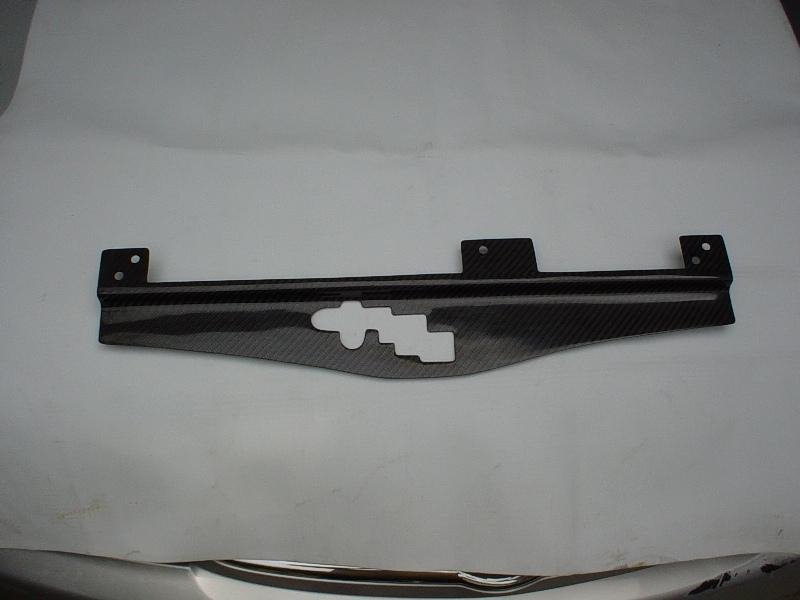
Closeup of the bottom surface. Yes, it's 101% carbon. No CSM aka fibreglass.
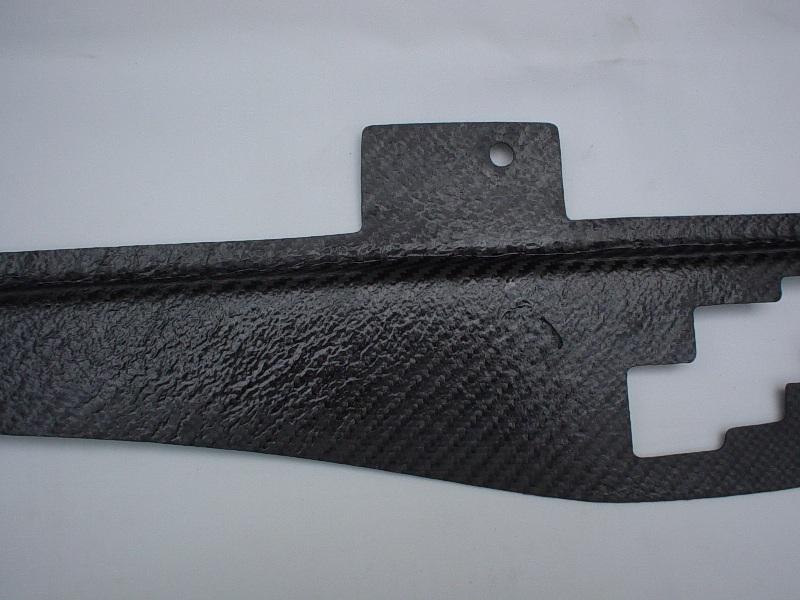
Installed on the SP. Button head bolt on the slam panel is Titanium. The 4 bolts holding the top radiator brackets is PB 7075 aluminium.
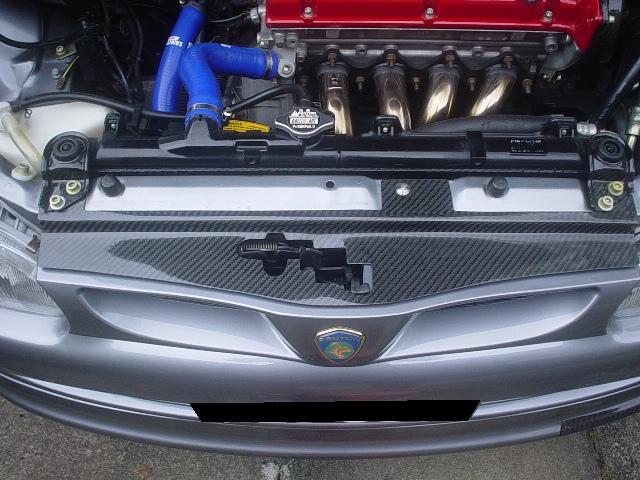
Saturday, April 01, 2006
Ralliart Group N Exhaust Hangers
A good way to extend the life of your exhaust by preventing it from moving too much under hard acceleration and braking would be to upgrade the stock exhaust hangers. The stock exhaust hangers are really too soft and they get even worse over a period of time. Too much movement of the exhaust would just lead to more stress related failures.
I have decided to upgrade my stock muffler hangers to Ralliart Group N items. These are made from Hs90 grade rubber and really much much stiffer than the stock hangers. The Putra runs 7 of such hangers but unless you like a vibrator to go with your performance car it would do you well to upgrade only 2 to 4 of these hangers. Do bear in mind that these hangers are essentially for race/rally/competition use where NVH is not in the agenda. I would recommend the header flange to exhaust piping/catalytic converter hanger section and the rear section of the exhaust muffler. Saves your hard earned money too as each hanger costs more than RM50 so if you upgrade all 7 it's more than 350 moolahs. Picture below of the 2 available types of Ralliart exhaust hangers. The Putra only uses the oval shaped one on the left (Part Number RA906124K1). The other triangular shaped one is for the Mitsubishi Lancer Evolution 4 onwards(Part Number RA651790K1). However only 1 unit of RA651790K1 is used. The other 6 are still the oval shaped hangers.

Picture below of installed Ralliart exhaust hangers
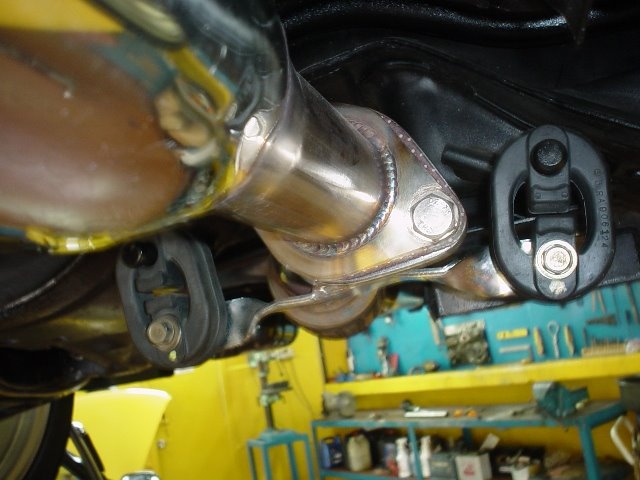
Monday, March 27, 2006
SP's Wheels and Brakes
A couple people have asked me bout the SP's wheels and brakes so here's a close up..

Front Brakes are Wilwood Dynapro 4 piston billet aluminium calipers with 276mm slotted rotors from DBA. Would love to go to a 295mm two-piece (aluminium bell) setup if and when the $$$$ materializes. Brake pads are Wilwood Polymatrix E-Compound. Master cylinder size is 1". Brake lines are Goodridge 600 series. Wheels are SSR Type C 16" 7" Offset 42 PCD100 4 lug but I'm running a 12mm spacer so effective front offset is +30mm. Also running longer 66mm Ralliart Group N lugs as the stock lugs does not offer enough thread for the lugnuts due to the spacer. Lugnuts are 7075 Anodized CNC Machined Aluminium items from Racing Gear @ Compomotive UK. Master cylinder size is 1" from an EVO1-3 (up from stock 15/16"). Cost so far is errrrm..

Front Brakes are Wilwood Dynapro 4 piston billet aluminium calipers with 276mm slotted rotors from DBA. Would love to go to a 295mm two-piece (aluminium bell) setup if and when the $$$$ materializes. Brake pads are Wilwood Polymatrix E-Compound. Master cylinder size is 1". Brake lines are Goodridge 600 series. Wheels are SSR Type C 16" 7" Offset 42 PCD100 4 lug but I'm running a 12mm spacer so effective front offset is +30mm. Also running longer 66mm Ralliart Group N lugs as the stock lugs does not offer enough thread for the lugnuts due to the spacer. Lugnuts are 7075 Anodized CNC Machined Aluminium items from Racing Gear @ Compomotive UK. Master cylinder size is 1" from an EVO1-3 (up from stock 15/16"). Cost so far is errrrm..
Subscribe to:
Posts (Atom)