Anyone else going for the HPC event on 30th Nov? Do drop a line as it will be nice to put a face to the name/nick on that day!
Thursday, September 18, 2008
HPC 30th November 2008
Anyone else going for the HPC event on 30th Nov? Do drop a line as it will be nice to put a face to the name/nick on that day!
ARP Head Stud Kit
Some information on the ARP studs :
"Obtaining the optimum cylinder head-to-block sealing is especially critical in small displacement engines employing high compression pistons or power adders like turbochargers, nitrous oxide and superchargers. That's why ARP® head studs are popular among leading Sport Compact/Import racers.
You should know that ARP® uses a premium grade 8740 alloy that is rated far superior to "aircraft" quality. Then, each stud is precisely heat-treated to 200,000 psi. Following heattreat, each stud is centerless ground to make it as close to perfectly concentric as possible. This procedure involves about ten very slight cuts and results in an exceptionally straight part. It's important to note that lesser quality studs are not even centerless ground—the material is thread rolled in bar stock form (mostly before heat-treat, when the material is easier to machine). Because ARP® studs are manufactured to such exacting tolerances, you will note that gaskets and cylinder heads literally glide into position and are perfectly aligned—something that won't happen with inferior quality head studs.
ARP® studs are thread rolled after heat-treat, which gives them about 1000% (that's ten times) better fatigue strength than those studs that are threaded prior to heat-treat.
You will also note that ARP® offers specially undercut studs for several engines. This procedure (done only to the shorter studs) more equalizes the "stretch" of both studs, which makes for a more consistent clamping force—one that compensates for head gasket compression when the head is installed. This helps prevent blown head gaskets, and assures optimum sealing!
Premium parallel ground washers are also included with each kit." Article from ARP website.
I bought this kit from RPW directly when I was in Perth. RPW are famous in Australia for the performance modifications on Mistsubishi's especially the older models. It was not cheap at AUD 295.00 for the head stud kit alone!
Some pictures:
The kit come with the stud, bolts, thick flat washers , ARP molybdenum assembly lube, installation guide (torque settings) and ARP sticker. ARP provides their own default torque values which is much higher than the manufacturers recommendation. This provides better sealing between the head and the gasket and ultimately much better reliability.
Monday, August 11, 2008
HPC 20th April 08
Jack's day started with a intercooler hose coming off just before arriving at the track. This was quickly fixed and all of us got into fixing the stickers which were provided. In Group 2 I think there were about 30 cars, RX7, RX8's, Impreza's, Satria Neo, Civics, old skool Saab and a few others. Feeling all jittery about the track and the car, I was taking it easy for the first few laps just to familiarize with the track and SP. After getting comfortable I started to push on and started to push the car more by braking later and trying different lines on the turns. So much so that at one point got too excited with my braking points and overcooked turn 9 while Sr was in the outside line and I was heading straight on to a RX7 which was halfway into the turn. Luckily I was able to keep things in check (thank you God!) and managed to avoid any incidents. I pulled in early to check the conditions under the hood and during that time was told off by the marshall that I cannot perform late braking and overtake on turn 9. Oh well, only if he really knew what happened.
Anyway it was a great outing for me and the SP and the car handled brilliantly on the track although it was smoking quite a lot, esp when I heel n toe into a turn, SP was emitting big clouds of white smoke from the exhaust. After the track day a top overhaul was required as the head gasket was on the way out and as well as the valve guides and a few other items which needed replacing. Jacko ended the day with a lil problem as well as his main relay gave way and was not able to start the car. Luckily his mechanic was there to watch the event and was able to make a quick fix. Well I will let the pictures do the talking.
CP's Gangster Green Slutria
Jack and his playstation, the SGTi of course!!
Cooling down after the first session - corner markers on the tyres were full before first session, now totally gone!
Khai's 147 Selespeed! Now replaced with a different turbocharged monster!
Seniors freaking fast GTi
Blasting through the straights
Another shot different angle
Me, wifey and SP after the track day!
Saturday, August 02, 2008
V Sixers Track Day 30th July
Tuesday, July 15, 2008
Jack's Coil on Plug Setup
This just installed over the weekend.. suppose to be a straight forward install since the boot fit perfectly to the engine head. The tricky part was sorted out i.e. the mounting plate. Since I did not know if this will work the aluminium mounting plate was not sent for lazercutting. It was done the old fashion was via a saw and a filer.
Where the coils came from
The install came down to making sure the wiring was done properly. As usual my Mech boasted that he can do this with one eyes closed. I complied and went on my business painting the cam cover. Lo-and-behold when we started the car it misfire and stumble badly during boost.... The problem with COP install began to creep up on me from posting on the net. There were issues on no rpm readings, low idle misfire to WOT high boost stumble and incorrect dwell time setting. My mech said I needed to retune the car. Feeling shitty, i went home disappointed and contemplate to GT auto or go back to the OEM ignition. After spending hours on the net. I figured that my mech did the wiring wrongly. He wired the coils in parallel instead of in series. In parallel the direct 12v to the coils lowered the resistance and caused the ignitor or Power Transistor Unit (PTU) to go haywire. The car in-turn will misfire, stumble and rpm readings will go nuts. Lancerregister and various DSM forums advised to rewire it in series and to their diagram and also regap the plugs to 0.026in or 0.6604mm.

The wiring was done nicely. All covered and connections was soldered and shrink wrapped. I even had my mech build a 3pin connector to my 2 Nology coils. So instead of splicing into the wiring it will just be a clean snap on with the connectors. 

Monday, July 14, 2008
Earl's Oil Cooler
As it is vital to keep the engine oil temperature in an optimum level, especially if the engine is producing a lot more horsepower and running very high compression ratio, I decided to install an oil cooler on the SP. Luckily or unluckily my work requires me to travel frequently and I happen to discover the Earl’s distributor in Sydney. With help and guidance from Jacko I purchased the cooler, mounting bracket ( in aluminium), Earl’s AN fittings and the SS braided hoses. I even got a set for Jacko as well for his wild GTi! Jack also helped to source out a sandwich plate with built in thermostat made out of cast aluminium from the US to complete the install.
The list of part which was required:
1x Earl's Oil Cooler 12x5x2, 16 ROW, -8AN
1x Earl's Aluminium Oil Cooler Mounting Kit for 16 row
4x Earl's -8 to 3/8 NPT adaptor
4x Earl's Swivelseal -8 90 deg hose end
Earl's Autoflex -8 hose approx 2meters
Mocal Aluminium Sandwich Plate with Thermostat
The cooler with all the fittings and brackets minus the hose and sandwich plate
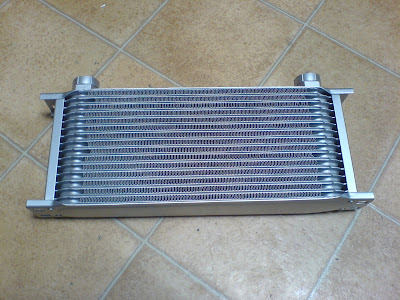
Close up of the Earl’s 16 row oil cooler
Sandwich plate in place with fittings and hoses.
Another view
Cooler installed (All fasteners were changed to Aluminium Potassium Bichromate soon after)
View with the bumper installed.
As I don’t have any gauges to measure the oil temperature or pressure YET, I am not able to ascertain how well this setup works, but since installing I have gone for one track day session and the car performed very well without any oil or coolant temperature problems.
I also bought a set of Earl's AN spanners to ensure that the fittings and hose ends do not get damaged when installing.
Earl's Wrenches for AN fittings. Not cheap at about AUD 35.00 per piece.
Tuesday, June 24, 2008
Koyo Aluminium Radiator
Engine bay with the standard radiator, radiator cap and hoses.
Engine bay with Koyo, Ralliart radiator cap and Samco Hoses
Side View with Koyo Radiator Installed
Another Shot – Last one I promise
The water temp only goes to half now during massive traffic jam especially on a very hot day. Usually its below the half level mark. Radiator fan also take a very long time before it kicks in and stays on just for a short while. Next step will be upgrading to the Ralliart Thermostat to try and get the fan coming on quicker especially during heavy traffic. Do remember that air-con must be switched off during traffic jam which means the aircond fan doesn’t run and less cooling through the radiator.
Latest Engine Bay Shot
Next Mods
Oil Cooler Kit
Crank Scraper
ARP Head Stud Bolts
Sard FPR.
Earl’s Fuel Filter
Complete Fuel Line conversion to SS braided hoses with Earl’s fitting and hose ends
Stay Tuned for more when I have the time.
Monday, June 23, 2008
A New Era
Unfortunately the pictures of the Ohlins before they were fitted were only taken through my handphone and they are not very good quality pictures.
The specification of the Ohlins:
Short Stroke Ohlins PCV for Lancer Evo 1,2,3
Front) Free length =200 mm, k=8 kgf/mm
Rear) Free length=200mm , k=6 kgf/mm
20 click adjustment for compression and rebound, not individually though.
Pillowball top mounts front and rear
Installation was fairly straightforward and installed it myself with help from a good buddy of mine, thanks Koh!. I must say that where the installation work was done the SP was actually the thorn among the roses!
Driving Impression
To be honest I thought the ride is going to be really stiff and jarring, but the damping of the Ohlins is really good so much so that its actually quite comfortable to be used daily. At least the SP is more comfortable then my Mini but that’s another story though!
I have wound the dampers to about 12 click from Max on the fronts and 15 clicks on the rear which is inline with Ohlins recommendation. The car was then aligned with front toe out of 1 deg and rears toe in of 1 deg as well. Cambers on the front were set to -1 deg. Potholes and speed humps are best avoided as the short stroke nature of the damper doesn’t really help in providing any form of comfort during these situations. However show it a good set of twisties and they really shine! High speed corners and highway ramps can be taken easily without any under or oversteer. The setting is very neutral and gives a high degree of confidence. All this is pretty much with the first try on the suspension setting. I need to play around more with different ride height and compression setting to really find out what it can do.
The SP has quite a lot done on the suspension and handling department already so the effect of the coilover is greatly multiplied I reckon. It’s akin to having porting work done to the cylinder head before a set of killer cams is fitted. Next step is to get the car corner weighted so that I can really benefit from the coilvoers.
Monday, December 10, 2007
S**t Happens!
The SP got broken into recently (Nov 30) with numerous parts stolen including the one off full carbon pre-preg bonnet. My heart goes out for Mugil. Publishing this note on behalf of Mugil...
"SP was broken into on Friday morning and the following items have been stolen from the car:
- Full CF Bonnet
- Momo Corse Model 78 Steering Wheel
- Works Bell Rapfix IIQuick Release (only the half connected to the Steering)
- CF Side Mirror
- Matspeed J5 ECU
- R3 CF Gear Knob
If you know or hear or offered any of the parts stated above do contact me at 012-3350607. A small reward will be provided if any of the items above can be recovered."
Anyone wanting more pixs of the stolen items is also welcomed to email me or comment in this blog.
Tuesday, March 13, 2007
Jacko's New Wheels
RM1850 for 4xrims + rim centering spacer + Alu Valves (New, after trade in old rims)
RM430 for Rays lugnuts
RM50 for new tyre removal tool
Need a new tyre removal socket as the Rays are 19mm and our original ones are 21mm.
Rims are light wei, handling went up one notch!! These are 16" and Enkei says it weights 13.7lbs = 6.2kg. The 15" are even more anorexic weigheing only 9.8lbs = 4.9kg. My tire guy initially bought in one 15" (silver) and two 16" (white). All of them are gone and I guess he wants to clear this. From what I read they are also very strong. I'm hoping that they will be excellent for track day. The car drives differently, small bumps and mid undulations are not so obvious now... reducing the unsprung weight also cause the steering to be a tad lighter and sharper.
I cant seem to find the center cap for the rims in Msai. To buy on-line is just to x, one will set you back US35.. OUCH!! Crazy man .. if any of you got jalan pls let me know, pics attached. They are special sized made for the Enkeis' only .. DUH!!
Got a set of Rays lugnuts too. These are the longer version ones, according to tire guy this is suppose to be better as they prevent scratches on the rims. Who says you cant have your rice and drive it too!! Hahahahaha ..... The rims even got a few eyefull from a bunch of ah bengs that were hanging around waiting for their carpet-zebra stripe dash-super spoiler vortex generator-brembo cover-hello kitty-interfooler super monster beast doing their alignment. I'm also a bit worried on caps of the aluminium valves beind nicked. Just yesterday I lost 3 on my old rims.. the new ones being a shade of ah beng blue .... sigh : (
There is also this ultralegga staring at me .. its nice and even lighter but out of my budget. Rims being white will have a headace cleaning it.. hopefully the guy that washes my car 3x a week wont complain too much... else have to top up his fee and buy him a can of rim cleaner every month.
I'm getting this for the price and performace and am hoping that the looks will grow on me ......
(Andrew) RPF1s installed with blue anodized Rays Engineering extended length lugnuts. Got Bling?