Now as much as the guy in the next Batman car would like you to believe, not all carbon bonnets or for that matter carbon parts are the same. Also there's no such thing as Grade A carbon, etc. The technology used can be summed up into 2 main ways of manufacturing carbon composite parts. These are wet-lay up (what the Japs like to call "wet" carbon") and pre-preg ("dry carbon"). A wet lay up when you lay the carbon cloth in the mould and then pour and roll the resin (liquid chemical "glue" in the simplest lay man explanation) over the cloth till you are satisfied with the saturation. A pre-preg carbon part is when the carbon cloth comes to you with the resin directly saturated in it already. A pre-preg carbon part is typically 2-3 times more expensive than a similiar wet-layup carbon part. This is because the pre-preg carbon cloth has to be shipped in refrigerated containers as the cloth will typically cure and harden when exposed to room temperature. The shelf life of pp material is also limited to weeks. While it would be preferable to use pre-preg carbon all the time you and I know that's virtuall impossible unless you have an F1 sized budget. It's also possible to get the quality of a wet lay-up part similiar to pre-preg and this is where the skill of the carbon laminator comes to play. I shall concentrate more on "wet" carbon technology as this is what most of us can afford.
There's a lot of hearsay and mumbo jumbo going around in local forums but contrary to popular belief not even wet lay-up carbon bonnets are all the same. In general your RM800 "wet" cf bonnet is not the same as another RM3000 "wet" cf bonnet. The adage "You get what you pay for" applies. When purchasing a carbon bonnet you will want to ask a few question. These are :
1. What is the resin used? Now this is most important I tell you. Again contrary to popular belief a big part of the strength of a carbon part comes from the resin itself. There are hundreds of types of resins or matrices used from cheapo polyester gel coats to vinyl ester (used by TVR for the Sagaris) to epoxy for which there are possibly hundreds of types and applications alone. To give you a run down the most expensive epoxy resin alone can cost 20 times more than the the cheapest polyester resin. Having said that it's perfectly ok to use gel coats for majority of performance or fast road applications.
2. Is the carbon part vacuum bagged? This is where the laminated carbon part is covered with a plastic bag and air is sucked out via a pump. This results is better saturation of the resin and ultimately better surface quality
3. How many layers of carbon? I can tell you the majority of carbon bonnets in our local market should really be called carbon reinforced fibreglass bonnets. These are really nothing more than fibreglass bonnets with one layer of carbon on top (if you py more another layer of carbon on the bottom under skeleton) for decorative purposes. Fibreglass is ok but nowhere near the lightness and strength of carbon.
4. Weight. Stock bonnet weights 14+ kg so you're ok if the carbon bonnet weights 6-8kg.
5. Is the bonnet clearcoated for UV protection?
There are many other factors to consider but most local carbon part manufacturers and retailers won't tell you peanuts so you just have to go with the top 5 questions above. I would also look for pinholes but it would take some training to spot these ;-)
Now on to SP's full carbon bonnet. It's 100% carbon with 4 layers for the top bonnet skin alone and 2 layers for the bottom skeleton. The resin used is classified (sorry) but suffice to say it's not gel coat and it's not epoxy. I've elected to retain some of the bottom skeleton bracing as I feel under skeletonless bonnets do not provide sufficient strength and support. Rap your knuckles on the bonnet and it sounds metallic. The bonnet is also very stiff in feel compared to other local carbon bonnets. Weight is 5.5kg only. Installation took quite a while as "adjustments" needed to be made to the latch and lock assembly to get a perfect fit. I also took the opportunity to fit a new grille from the Wira SE and clearcoat the bonnet with Glasurit lacquer. Will talk more about the new grille in a separate article. Clearcoating and finishing the bonnet was a real pain and took many many hours, days and $$$$. In general you need to do the following:
1. Sand the bonnet down with 180, 240 then 320 grit sandpaper
2. Apply (spray) clearcoat
3. Repeat the process until you get the finish you want to your standards
By nature of the carbon lay-up process surface imperfections are often a very common sight and it really takes a lot of work and skill to get good finish quality. Reverie UK (popular cf maker of performance parts for Lotus Elise and Caterham) actually carry this disclaimer on their
web site
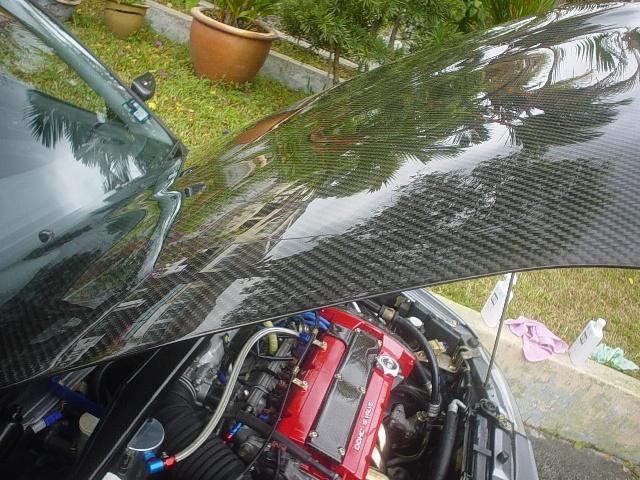
Picture of SP with new bonnet and grille fitted. Fitment is near perfect. What do you think bout the surface definition and quality?

Another shot with flash

Closer up and with flash to show straightness of weaves

Look at how thin and sharp the edges are
Picture of bonnet under skin and bracing skeleton. The bonnet is able to utilize back all the stock rubber seals.

Another under skin pix where the windscreen washer rubber piping runs to the windscreen cleaner nozzle
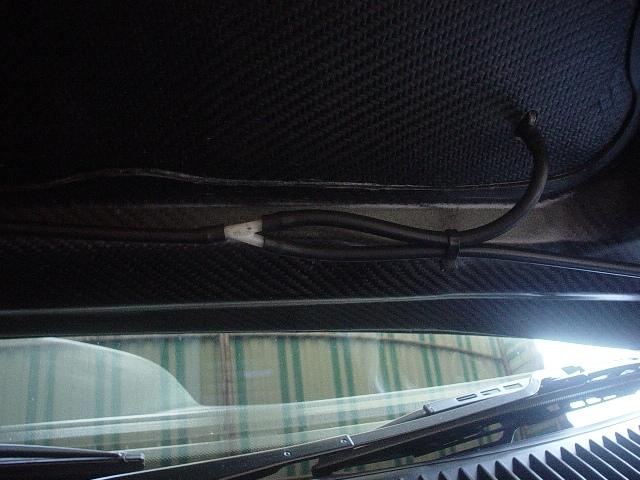
Bonnet incorporates double latch assembly as per stock bonnet. Latch hook is stainless steel.

Another arty close up front nose shot

Next steps would be to fit the Aerocatch bonnet pin that is currently gathering dust in my room. I think I'll also take a breather from carbon parts for a while as I'm dead broke (you don't wanna know the cost of the bonnet in material cost alone) and need to recover physically and mentally. More pictures in my upcoming new grille article. Oh and does anyone want to buy an excellent condition metallic grey coloured stock Putra bonnet?
8 comments:
thumbs up!
i need thicker wallet
wah! nice lerh ur finishing!! if my cf broken again, im sure to order one frm u!!!
The std bonnet will not have such a finish. Had to get my regular painter to redo the finish to my standards.
ur standards are top class lerh! i think thats great! ur wallet also top class leh i suppose! hehe... can see great expenses have been contributed to the completion of "project cf hood" XD..
Well I had to make sacrifices. My underwear full of holes also never replace plus lotsa broth and maggi mee lately helps ;-)
hehe.. drivers mah... sacrifice comfort for performance.. now even non-car related comfort also sacrificed... haha
love your attention to detail bro, any chance i can get something like yours made for a different car?
John,
Don't think so. Just too much effort and hassle..
Post a Comment